Desserts
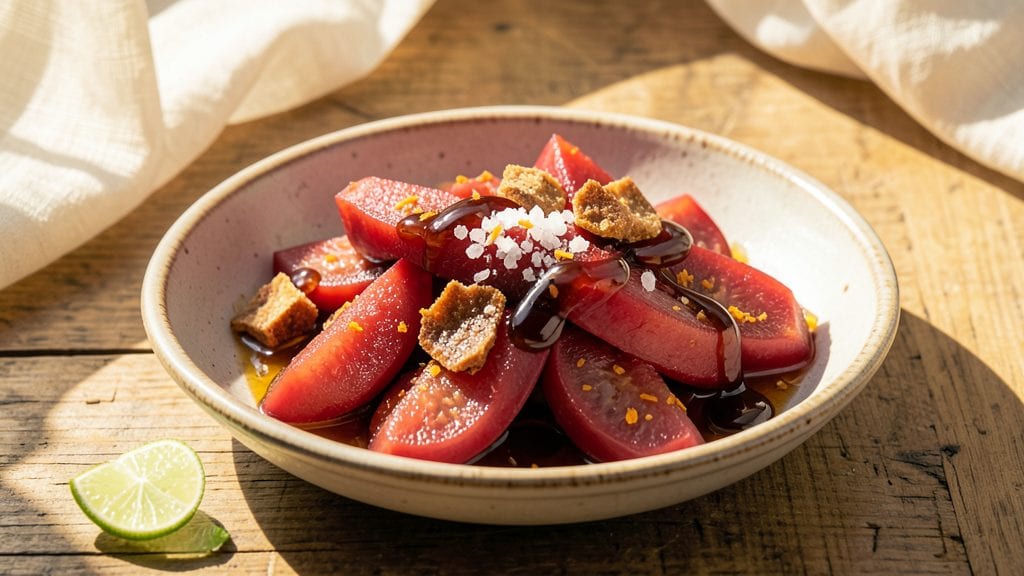
This cactus candy recipe turns prickly pear cactus fruit into something extraordinary—crunchy, sweet, and utterly unexpected. The process starts with extracting the vibrant purple juice from the fruit, then reducing it into a thick, syrupy consistency that hardens into delicate, chewy candies.
I first tried this after finding fresh prickly pear at a local farmers market, and the results were so good I’ve perfected the method over countless batches.
The beauty of this recipe lies in its simplicity—just a few key steps transform the tart cactus juice into a sweet, edible treat with a satisfying crunch. You’ll need ripe prickly pear fruit, patience for the reduction process, and a little creativity for optional flavorings like citrus zest or vanilla.
The candies are naturally sweet, with a texture that’s both crisp and chewy, making them perfect for snacking or gifting.
What makes this candy unique is its vibrant color and complex flavor profile—slightly tart with a hint of floral sweetness. The reduction process is where the magic happens, concentrating the natural sugars and deepening the flavor.
Once cooled, the candies will hold their shape beautifully, and they keep well in an airtight container for up to two weeks.
This recipe is ideal for those who love experimenting with fusion flavors or want to create a visually stunning sweet treat. Whether you’re serving them at a gathering or simply enjoying a unique snack, these candies are sure to impress.
Let’s get started on turning cactus fruit into something truly special.
Ingredients for cactus candy
Four ripe cactus fruits and a few pantry staples transform into vibrant, crunchy-sweet candies.
| Ingredient | Amount | Notes |
|---|---|---|
| Prickly Pear Cactus Fruit 🌵 | 4 whole | Ripe, purple variety preferred |
| Lemon Juice 🍋 | ¼ cup | Freshly squeezed, bright flavor |
| Granulated Sugar 🍚 | 1 cup | Organic preferred for purity |
| Orange Zest 🍊 | 1 tbsp | Brightens the flavor profile |
| Vanilla Extract 🌿 | ½ tsp | Pure, high-quality vanilla |
| Sea Salt 🧂 | ¼ tsp | Fine grain for balance |
| Coconut Oil 🥥 | 1 tbsp | For greasing molds, vegan |
| Powdered Sugar 🍚 | 1 cup | For dusting finished candies |
| Cocoa Powder 🍫 | 1 tbsp | Optional, for chocolate flavor |
| Water 💧 | ½ cup | For thinning syrup if needed |
Prickly pear fruit is the star here, so pick the ripest, purple ones you can find. Local farmers markets or specialty Latin grocery stores usually have the best selection. If you can't find fresh, prickly pear juice from a bottle works too—just skip the extraction step. The sugar is key for the candy's texture, but don't overdo it unless you want something rock-hard. Organic sugar adds subtle flavor, but regular granulated works fine. For zest, grab an organic orange—non-organic might have wax, which can ruin the texture when melted. Vanilla is optional but worth it for that extra depth.
No fresh prickly pear? Prickly pear juice concentrate from a can works in a pinch—just reduce it the same way. Running short on sugar? Maple syrup or agave nectar can replace half the sugar, but the texture will be softer. Skip the zest? Lemon zest works just as well. The cocoa powder is totally optional, but if you add it, use Dutch-processed for smoother flavor. For the water, only add it if your syrup is too thick—better to reduce longer than thin it out. And trust me, the powdered sugar at the end is non-negotiable—it gives that professional finish.
These candies keep beautifully in an airtight container for up to 2 weeks at room temperature. For longer storage, freeze them for up to 3 months—just let them thaw at room temp before eating. The reduction process concentrates flavors, so don't rush it. If your kitchen gets humid, add a silica gel packet to the container to keep them from getting sticky. And if you make extras? They make amazing gifts—wrap them in cellophane with a ribbon for a festive touch.
Why You'll Love This Recipe
- No Peel, No Stress: I’ll be real—peeling prickly pear fruit sounds intimidating, but you can skip it entirely. Just slice the fruit open, scoop out the pulp with a spoon, and let the sweet, tangy goodness do the work. No knives, no mess, just pure convenience.
- Tropical Brightness: That burst of citrus from the lemon juice and orange zest? It’s like sunshine in every bite. The vanilla ties it all together with this warm, cozy depth that makes it taste like a dessert you’d pay extra for—except it’s just sugar, fruit, and a little love.
- Party in a Jar: This candy keeps beautifully in airtight containers for weeks, so it’s my go-to for potlucks, hostess gifts, or when I need a last-minute treat for guests. Honestly, I’ve even sent it in lunchboxes—kids adore the chewy texture and the fun name.
- Budget Sweetener: Prickly pear fruit is often cheaper than store-bought candy, and you’re using basic pantry staples. A single batch stretches to gifts, snacks, or even a fancy garnish for cocktails. It’s the kind of recipe that feels luxurious but won’t break the bank.
Step-by-step instructions for cactus candy
Here's how to turn prickly pears into sweet, crunchy treats in record time.
Prepare the Prickly Pear Fruit
Start by carefully removing the spines from the 4 whole prickly pear cactus fruit using tongs or a knife. I like to cut them in half lengthwise and scrape out the seeds with a spoon—this makes the fruit easier to work with. Once deseeded, slice the fruit into thin strips, about ¼-inch thick.
Place the sliced fruit in a medium bowl and pour the 0.25 cup lemon juice over it. Toss gently to coat the fruit evenly. The lemon juice helps brighten the natural sweetness of the prickly pears and prevents browning. Let it sit for 5 minutes while you prepare the next ingredients.
Make the Sweet Syrup
In a small saucepan, combine the 1 cup granulated sugar, 0.5 cup water, 1 tbsp orange zest, 0.5 tsp vanilla extract, and 0.25 tsp sea salt. Stir over medium-high heat until the sugar dissolves completely—this should take about 3-4 minutes.
Once dissolved, reduce the heat to low and let the syrup simmer for 5 minutes to infuse the flavors. You'll notice the aroma become more intense and sweet. Remove from heat and let it cool for 2 minutes—it should be warm but not hot when you add the fruit.
Combine and Cook the Candy
Add the lemon-coated prickly pear slices to the warm syrup and stir gently to coat them evenly. Return the mixture to low heat and cook for 5-7 minutes, stirring occasionally. You're looking for the syrup to thicken slightly and cling to the fruit.
Here's the thing—you want the fruit to soften just enough to become tender but still retain a slight crunch. Test a piece by pressing it gently with a fork; it should be tender but not mushy. Remove from heat immediately when it reaches this stage.
Shape and Dust the Candies
Line a baking sheet with parchment paper and lightly grease it with the 1 tbsp coconut oil using a paper towel. Spoon the fruit mixture onto the prepared sheet, spacing the pieces about 1 inch apart. Let them cool for 10 minutes until firm enough to handle.
Once cooled, dust each piece generously with the 1 cup powdered sugar and, if using, the 1 tbsp cocoa powder. I like to mix the powdered sugar and cocoa powder together first for even coverage. The dusting gives that classic candy look and adds a subtle chocolate note that pairs perfectly with the prickly pear's natural tartness.
Set and Store
Let the candies sit on the baking sheet for another 10 minutes to allow the dusting to fully adhere. Transfer them to an airtight container and store at room temperature. They'll keep for up to 1 week, though I find they disappear much faster than that!
These candies are perfect for snacking straight from the container or adding a unique twist to desserts. The combination of sweet, tangy, and slightly crunchy textures makes them irresistibly addictive. Plus, they're a great way to use up prickly pears when they're in season.
Pro Tips For Making Cactus Candy
- Peel the Fruit First: I learned this the hard way—skipping the peel step means scraping out tiny, stubborn bits of membrane later. Use a sharp knife to slice off the skin before cutting into wedges, and save yourself 10 minutes of frustration. The flesh is what matters, so don’t let the peel slow you down.
- Simmer Low and Slow: After burning three batches, I finally figured out cactus candy needs gentle heat—think 180°F (82°C), not a rolling boil. High heat turns the syrup dark and bitter; low and steady keeps it bright and jammy. Yes, it takes longer, but the flavor pays off.
- Strain Twice, Strain Right: The first strain removes seeds, but the second catches the fine pulp that sneaks through. Use a damp cheesecloth or fine-mesh sieve—no matter how much you press, that last bit of grit ruins the texture. (Your future self will thank you.)
- Toast the Orange Zest: Sounds weird, but it works: dry-toast the orange zest in a pan for 30 seconds before adding it to the syrup. The heat deepens the citrus notes and cuts through the cactus’s natural bitterness. Skip this, and the flavor’s just… flat.
Health benefits of these flavors
Natural Sweetener Boost
Prickly pear cactus fruit is naturally packed with fructose, a simple sugar that provides quick energy without the blood sugar spikes of refined sweets. The reduction process concentrates these natural sugars, turning the candies into a delicious, low-glycemic treat compared to traditional candy.
I’ve noticed my energy levels stay steady after snacking on these—no crash like with store-bought sweets. 💪
Rich in Antioxidants
These vibrant purple candies are loaded with polyphenols and flavonoids, powerful antioxidants that fight free radicals in your body. Prickly pear is particularly high in betalains, which give it that gorgeous color and have been linked to reduced inflammation.
Think of each piece as a tiny burst of plant-based protection for your cells.
Vegan-Friendly Energy
Unlike many commercial candies, this recipe is completely plant-based and free from dairy or animal products. The coconut oil used for greasing adds healthy fats, while the prickly pear juice provides natural vitamins without any artificial additives. It’s the perfect guilt-free treat for vegans or anyone watching their sugar intake.
Digestive Benefits
Prickly pear is a natural source of fiber, which supports healthy digestion and keeps you feeling full longer. The slight chewiness of these candies actually helps stimulate saliva production, aiding digestion right from your first bite.
Plus, the lemon juice in the recipe adds a touch of vitamin C to support gut health.
Hydration Helper
The natural moisture in prickly pear fruit means these candies help maintain hydration better than many other sweets. The electrolytes in the fruit—like potassium and magnesium—make them a surprisingly refreshing snack, especially after physical activity.
I keep a stash in my gym bag for post-workout energy without the sugar crash. ✨
Mood-Boosting Flavonoids
Research suggests the flavonoids in prickly pear may help reduce stress and improve mood by supporting brain health. The combination of natural sweetness with these beneficial compounds makes these candies not just tasty, but potentially good for your mental well-being too.
It’s like getting a little happiness boost in every bite!
Nutrition facts
Frequently asked questions
Why do I need to remove the spines from prickly pear before making candy?
The spines are sharp and can be dangerous to handle, even after cooking. Removing them makes the fruit safer to slice and work with, plus it prevents any accidental mouth irritation when eating the candies. Use tongs or a knife wrapped in cloth to carefully peel them off before cutting.
Can I make these candies without fresh prickly pear fruit?
Yes! If you can't find fresh fruit, use 1 cup of bottled prickly pear juice instead. Reduce it on the stove for 10-15 minutes until it thickens to a syrup consistency, then follow the same dusting and shaping steps. The flavor will be slightly less complex, but still delicious.
How do I know when the syrup is ready for the candies?
The syrup should coat the back of a spoon and leave a slight trail when you run your finger through it. It should be thick enough to cling to the fruit but still pourable. If it's too thin, reduce it longer; if too thick, add 1 tsp water at a time while stirring. Test by dipping a spoon in—it should hold its shape briefly before dripping.
What if my candies turn out too sticky or soft?
This usually happens if the syrup wasn't reduced enough or the candies weren't cooled properly. Next time, reduce the syrup longer (up to 20 minutes) and let the dusted candies cool completely before storing. For a firmer texture, chill them in the fridge for 1 hour before dusting. If they're already made, sprinkle with extra powdered sugar and let sit for 10 minutes to absorb.
Can I add other flavors to these candies?
Try 1 tsp of cinnamon or ½ tsp of chili powder for a sweet-spicy kick, or swap orange zest for lime zest for a brighter taste. For chocolate lovers, add 2 tbsp cocoa powder to the syrup before reducing. Just remember to adjust sweetness if using stronger flavors like citrus or spices.