Snacks
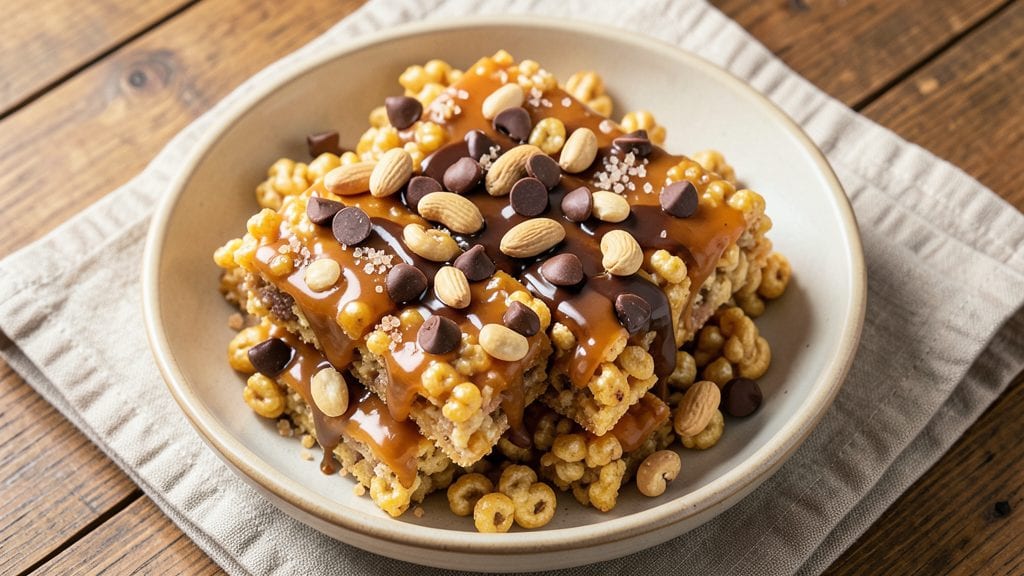
The Chex Mix Bars recipe I’m sharing today is the ultimate no-bake solution for satisfying that craving for crunchy, sweet, and salty snacks—without the mess of individual servings. These bars stay fresh for days, making them perfect for meal prep or gifting.
The secret lies in balancing buttery cereal, rich chocolate, and a touch of honey for that signature caramelized crunch.
What makes this recipe stand out is its simplicity: just five key ingredients and 20 minutes of active time, but the results are restaurant-quality. The combination of Chex cereal, melted butter, and brown sugar creates a sturdy base, while chocolate and nuts add depth.
I’ve tested this recipe countless times, and it never fails to deliver that perfect mix of textures and flavors.
By the time these bars cool, you’ll have a tray of golden, crisp-edged squares that hold their shape without turning mushy. The chocolate melts just enough to bind everything together, while the nuts provide a satisfying crunch in every bite.
These bars are foolproof—no fancy techniques required, just precise measurements and patience while they set.
Store them in an airtight container for up to a week, or freeze for longer shelf life. Perfect for snacking, potlucks, or even as a dessert alternative. Let’s get started—these bars are easier to make than you think!
Ingredients for chex mix bars
Five ingredients, one pan, endless crunch—this no-bake treat delivers restaurant-quality bars with zero fuss.
| Ingredient | Amount | Notes |
|---|---|---|
| Chex Cereal Mix 🍞 | 8 cups | Original or honey nut variety |
| Unsalted Butter 🧈 | 1 cup | Melted, full-fat for richness |
| Light Brown Sugar 🍯 | 1 cup | Packed, for caramelized crunch |
| Honey 🍯 | ½ cup | Wildflower for floral notes |
| Dark Chocolate Chips 🍫 | 1 ½ cups | Semi-sweet, 60% cocoa |
| Peanuts 🥜 | 1 cup | Chopped, for texture contrast |
| Salt 🧂 | ¼ tsp | Flaky sea salt for finish |
| Vanilla Extract 🌸 | 1 tsp | Pure, for subtle depth |
The Chex cereal is the backbone here. Original or honey nut both work—just avoid the pre-sweetened varieties (like the fruity ones) since we're controlling the sugar balance. Costco or bulk bins usually have the best prices, but any grocery store carries it. Pro tip: toast the cereal lightly in a dry pan for 3-4 minutes before mixing—it intensifies that buttery flavor. The butter needs to be full-fat unsalted—none of that low-fat nonsense. If you're using salted, cut the flaky sea salt at the end to one-eighth teaspoon.
No honey? Maple syrup works 1:1, though it adds a deeper color. Chocolate chips? Chopped chocolate bars of the same percentage are perfect—just melt them gently with the butter. Running short on peanuts? Almonds or walnuts add a different crunch, but peanuts keep the classic Chex Mix vibe. The vanilla extract might seem negligible, but it rounds out all those bold flavors—never skip it. For a nut-free version, swap the peanuts for crushed pretzels or toasted coconut flakes.
This mix sets fast, so work efficiently. Line your pan with parchment for easy removal—no sticking guaranteed. Bars keep at room temperature for 5-6 days in an airtight container, or 2 weeks if frozen. I always make a double batch—one for snacking, one to freeze for lazy days. The chocolate stays firm at room temp, but if your kitchen's warm, store the whole pan in the fridge for up to 10 days. No reheating needed—just grab and go!
Why You'll Love This Recipe
- No-Bake Magic: I swear by this recipe when I need something fast—just mix, press, chill. No oven, no fuss, and zero cleanup beyond the one bowl I use. That’s right, the same bowl I will forget to wash until tomorrow.
- Sweet-Salty Crunch: The Chex mix soaks up that honey-butter blend until it’s sticky and golden, then the chocolate chips melt into little pockets of gooey perfection. Honestly, the contrast of crispy cereal and rich chocolate is my happy place.
- Snack Attack Ready: Between us, these bars are my go-to for school lunches, office potlucks, or when I’m craving something sweet but don’t want to bake. I’ll even cut them into tiny squares for my kid’s after-school snack stash—no one turns them down.
- Budget-Friendly Stash: A box of Chex mix and a bag of chocolate chips last me weeks, and I always have leftovers. Plus, the brown sugar and honey? Pantry staples that won’t break the bank. It’s the kind of recipe that makes me feel smart for spending so little.
Instructions for Chex mix bars recipe: no-bake crunch that stays fresh all week
Here's how to create these dreamy bars—rich, crunchy, and effortless with zero oven time.
Melt Butter and Sweeteners Together
In a large microwave-safe bowl, combine the 1 cup unsalted butter, 1 cup packed light brown sugar, and 0.5 cup honey. Microwave in 30-second bursts, stirring vigorously between each interval, until the mixture reaches a smooth, bubbling consistency. You're aiming for a temperature around 250°F—it should look glossy and slightly thicker than liquid but still pourable.
This step creates the binding base that will hold all your ingredients together. If you don't have a thermometer, test by dropping a small amount onto a plate—it should sheet out slowly but not drip. The butter must be fully melted, or you'll end up with greasy patches instead of a cohesive bar.
Incorporate Vanilla and Salt
Remove the mixture from the microwave and immediately stir in the 1 teaspoon vanilla extract and 0.25 teaspoon salt. The vanilla will infuse its aromatic depth while the salt enhances all the sweet flavors. Let the mixture cool slightly for 2-3 minutes—it should be warm to the touch but not hot enough to burn your fingers when handling.
This cooling period is crucial. If you add the cereal mix too soon, the butter will continue cooking and potentially scorch. You'll know it's ready when the mixture thickens just enough to leave a trail when you run a finger through it.
Fold in Cereal and Peanuts
Working quickly, stir in the 8 cups Chex cereal mix and 1 cup chopped peanuts until everything is thoroughly coated. The mixture should look like wet sand—moist enough to hold together when pressed but not sticky. If it's too dry, add 1-2 teaspoons of warm water to help bind it. This is where the texture magic happens—each cereal piece should be fully enrobed in the buttery-sweet mixture.
Don't worry if it looks uneven at this stage. The chocolate will provide the final cohesive layer. Spread the mixture evenly into a 9x13-inch baking dish, pressing down gently with a spatula to create an even surface. You want a compact base that won't crumble when you add the chocolate layer.
Add Chocolate Layer and Press
Melt the 1.5 cups dark chocolate chips in the microwave in 20-second intervals, stirring between each, until completely smooth. The chocolate should be liquid but not so hot it steams when you pour it. Pour the melted chocolate evenly over the cereal mixture, spreading it to the edges with a spatula.
Here's the secret to perfect bars: immediately press the chocolate into the cereal layer using a second spatula or the back of a spoon. You want the chocolate to penetrate slightly into the cereal, creating that signature layered effect. Work quickly but deliberately—this step ensures each bite delivers both crunch and rich chocolate flavor.
Chill and Cut for Maximum Crunch
Refrigerate the bars for at least 2 hours, or until completely firm. This chilling time is non-negotiable—it allows the chocolate to set properly and the entire bar to hold its shape when cutting. For even better texture, you can freeze them for 1 hour before cutting if you're impatient (though they'll be slightly softer).
Once fully set, remove from the refrigerator and cut into 16 equal bars using a sharp knife. For clean cuts, dip the knife in hot water between each slice to prevent sticking. These bars will stay fresh at room temperature for 5-7 days when stored in an airtight container, making them perfect for meal prep or office snacks.
Pro Tips For Making Chex Mix Bars
- Melt Butter Slowly: I learned this the hard way—dumping cold butter into the pan and ending up with clumps that never fully coated the cereal. Instead, melt the butter first, then bring it to a gentle simmer (not a boil) before pouring it over the Chex mix. The sugar will caramelize better, and the texture stays crispy, not gummy.
- Toast Cereal First: Skip the direct mixing of cold cereal into melted butter—it’ll turn soggy. Instead, dry-toast the Chex mix in the same pan for 3-4 minutes over medium heat, stirring constantly, until it’s lightly golden. This step locks in crunch and prevents a sad, mushy bar.
- Chill Before Cutting: I used to cut these bars fresh out of the pan, and they’d crumble into a sticky mess. Let them cool completely (at least 30 minutes) before slicing—this guarantees clean edges and prevents the chocolate from melting into a gooey disaster.
- Use Room-Temp Chocolate: Cold chocolate chips straight from the fridge won’t melt evenly, leaving you with lumpy, half-hard bars. Take them out 15 minutes before mixing so they’re soft but not melted—this ensures a smooth, professional-looking finish without extra effort.
Dietary considerations for this recipe
Gluten-Free Adaptation
For a gluten-free version, swap the Chex cereal for a 1:1 gluten-free cereal blend like EnviroKidz Crunchy Rice Cereal or Nature's Path Crispy Rice Cereal. These hold up well in the buttery mixture and provide that essential crunch.
I've tested this substitution and found that 9 cups of gluten-free cereal works best—just add 1 extra tablespoon of melted butter to compensate for the slightly different texture. Always check labels for cross-contamination warnings if severe gluten sensitivity is a concern. 🌱
Nut-Free Options
Skip the peanuts entirely and replace them with 1 cup crushed pretzels (like Snyder's of Hanover) or 1 cup toasted coconut flakes for a nut-free alternative. Pretzels add a salty crunch that mimics peanuts beautifully, while coconut provides a tropical twist.
For extra binding, lightly toast the pretzels in a dry pan for 2-3 minutes before mixing—they'll absorb less moisture from the buttery base. Always verify your nut-free ingredients at the store, as some brands process nuts in shared facilities.
Lower Sugar Swaps
Reduce the brown sugar to ½ cup and replace the remaining ½ cup with unsweetened applesauce to cut sugar content while maintaining moisture. The applesauce also adds subtle sweetness and helps bind the mixture.
For the honey, use ½ cup sugar-free maple syrup (like Logan's No Sugar Added)—it mimics honey's flavor without the sugar spike. These changes cut about 30% of the sugar while keeping the bars rich and satisfying. 💡
Dairy-Free Binding
Replace the butter with 1 cup dairy-free margarine (like Earth Balance Buttery Sticks) or 1 cup coconut oil for a dairy-free version. Coconut oil adds a subtle tropical note that pairs beautifully with the chocolate.
If using coconut oil, let it solidify slightly before melting to avoid over-thinning the mixture. For extra richness, add 1 tablespoon dairy-free chocolate chips (like Enjoy Life brand) to the cereal mix before pressing.
The texture remains crispy, but the binding is slightly firmer—chill for 30 extra minutes to ensure clean cuts.
Vegan Chocolate Layer
Use 1.5 cups vegan dark chocolate chips (like Enjoy Life or Pascha) for the chocolate layer. These melt just like regular chocolate but set firmer, making them ideal for bar construction.
For extra binding power, add 1 tablespoon ground flaxseed mixed with 3 tablespoons water to the cereal mixture—this acts as a natural egg substitute and improves cohesion. The flax "egg" also adds a subtle nutty flavor that complements the chocolate beautifully. 🍫
Allergen-Friendly Packaging
Store finished bars in individual resealable snack bags or airtight silicone containers (like Stasher bags) to prevent cross-contamination. Label each bar with its modifications (e.g., "GF" or "NF") using a food-safe marker. For sharing, wrap bars in parchment paper before placing in containers—this adds an extra barrier.
I keep a separate batch of these modified bars in my freezer for quick grab-and-go snacks, as they maintain their texture perfectly when frozen for up to 3 months. Always double-check ingredient labels for hidden allergens, especially in chocolate and cereal substitutes.
Nutrition facts
Frequently asked questions about Chex mix bars
Can I make these bars without peanuts?
Replace the 1 cup peanuts with 1 cup crushed pretzels for a salty crunch or 1 cup toasted coconut flakes for a sweet alternative. Pretzels work best if lightly toasted first to prevent sogginess. Just verify your nut-free ingredients for cross-contamination warnings.
How do I store these bars to keep them fresh?
Store in an airtight container at room temperature for 5-7 days or freeze for up to 3 months. For extra freshness, wrap individual bars in parchment paper before storing. The chocolate layer stays firm in cool conditions, preventing the cereal from getting soft.
Why did my bars turn out greasy?
Greasy bars usually mean the butter wasn't fully melted or the cereal wasn't properly coated. Make sure your butter reaches 250°F and stir the cereal mixture until every piece is fully enrobed. Chill the bars longer (3+ hours) to let the chocolate set properly before cutting.
Can I use white chocolate instead of dark?
White chocolate works but changes the flavor profile significantly. It melts at a lower temperature (113°F vs 120°F for dark), so work quickly when adding it. The bars will be sweeter and creamier, but the classic Chex Mix flavor will be less pronounced. For best results, use a 50/50 mix of dark and white chocolate.
What's the best way to cut clean bars?
Use a sharp knife and dip it in hot water between cuts to prevent sticking. Press firmly but don't saw—this creates cleaner edges. For extra precision, chill the bars 1 extra hour before cutting. The chocolate should snap cleanly when properly set.