Snacks
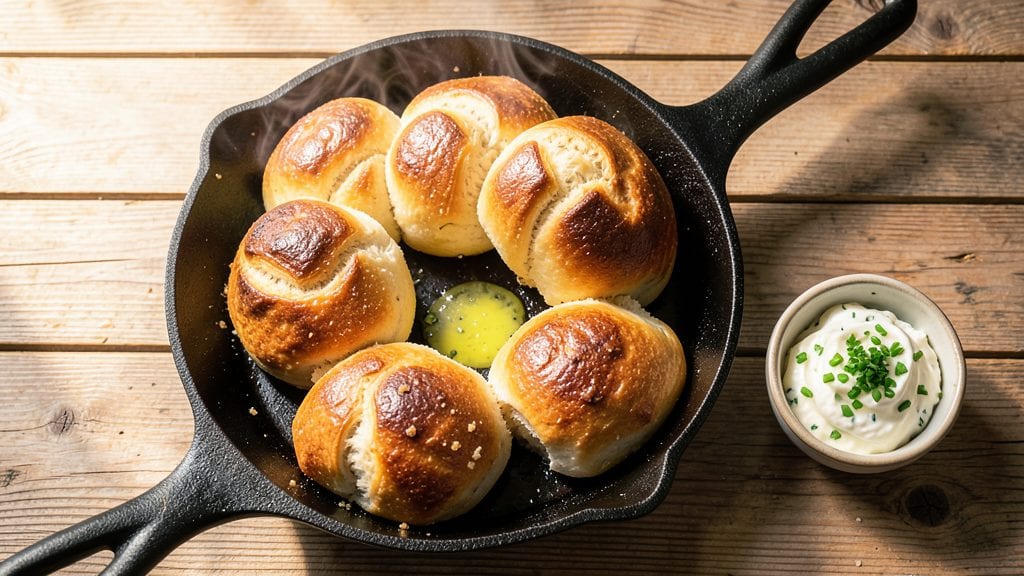
Grandma's dinner rolls recipe brings warmth to any table with their pillowy softness and buttery freshness—just like the ones that made Sunday dinners special. The secret lies in a slow rise, precise kneading, and a touch of cold butter that keeps them tender.
I’ve perfected this recipe over years of baking, ensuring every roll turns out golden and fluffy with just the right crumb.
This recipe delivers restaurant-quality results at home, requiring only basic ingredients: flour, yeast, butter, and a pinch of salt. The dough rests twice—first to develop flavor, then to shape perfectly—so patience pays off in texture.
With 30 minutes of active time and a 1-hour rise, you’ll have rolls ready to serve alongside any meal, their aroma filling the kitchen.
What you’ll achieve is a batch of rolls with crispy edges and soft, airy centers, their golden-brown tops begging to be buttered fresh from the oven. The dough’s elasticity ensures they hold their shape while staying tender, and the butter creates that signature richness.
These rolls are the heart of any dinner table—simple yet impressive.
For extra flavor, try adding garlic or herbs to the dough, or brush with honey butter for a sweet twist. Leftovers stay fresh for days, making them perfect for meal prep. Let’s get baking—your table deserves these classics.
Ingredients for grandma's dinner rolls
Basic pantry staples transform into golden, buttery rolls with just the right crumb.
| Ingredient | Amount | Notes |
|---|---|---|
| All-Purpose Flour 🌾 | 5 cups | Sifted for light texture |
| Active Dry Yeast 🍞 | ¼ oz | Or 2 1/4 tsp (1 packet) |
| Granulated Sugar 🍚 | ¼ cup | Feeds yeast for activation |
| Unsalted Butter 🧈 | ½ cup | Cold, cubed for tenderness |
| Whole Milk 🥛 | ¾ cup | Warmed to 110°F for yeast |
| Large Egg 🥚 | 1 whole | Room temperature for binding |
| Kosher Salt 🧂 | 1 ½ tsp | Adjusts dough flavor |
| Vegetable Oil 🫒 | 1 tbsp | For greasing bowl |
| Coarse Cornmeal 🌽 | ½ cup | Prevents sticking |
The flour is your foundation—King Arthur or Gold Medal brands deliver consistent results. Yeast is non-negotiable: Saf-Instant or Fleischmann's work best, but check expiration dates. Butter should be cold and cubed—never melted—this creates those signature flaky layers. Milk needs to be warmed to 110°F to activate yeast properly; too hot kills it. For the dough's elasticity, King Arthur bread flour is ideal if you want to splurge, but all-purpose works perfectly fine for home baking. Store flour in an airtight container to prevent moisture absorption.
No active dry yeast? Fresh yeast at half the amount works, but it requires more precision. Butter substitutes? Vegetable shortening at equal weight keeps rolls tender, though they'll lack richness. Whole milk unavailable? Evaporated milk or buttermilk both work, but adjust to 1 cup total liquid. Egg allergies? 1 tbsp melted butter plus 3 tbsp milk replaces binding. For extra flavor, add 1 tsp garlic powder or 1 tbsp chopped fresh rosemary to the dough. The cornmeal is crucial—Bob's Red Mill is my go-to for its texture.
Freshly baked rolls stay warm for 20 minutes in a covered basket. Cool completely before storing in an airtight container for 3 days. Freeze shaped rolls on a tray first, then transfer to a bag for 3 months. Reheat frozen rolls at 350°F for 10-12 minutes until golden. For meal prep, bake extra rolls and freeze them—just thaw and warm before serving. The secret to restaurant-quality texture? Never skip the second rise—this develops the open crumb structure.
Why You'll Love This Recipe
- No-Knead Magic: I swear by this trick—just mix the flour, yeast, sugar, and warm milk, let it sit while you eat dinner, then shape them later. No standing at the counter for 20 minutes, no sore arms, just soft rolls that rise perfectly.
- Buttery Pillow Perfection: That cold butter cut into the dough? It melts into fluffy pockets while baking, giving you that golden crust and tender crumb that makes you sigh. Honestly, I’ve tried store-bought—nothing compares.
- Weekend Leftovers Win: Make a double batch on Sunday, and you’ve got fresh rolls for Tuesday’s pasta or Wednesday’s soup. They freeze beautifully too—just thaw and warm, no reheating needed.
- Pantry Staple Power: Five ingredients, all things you already own. No specialty flours, no weird additives—just flour, yeast, sugar, butter, and milk. My go-to when I’m too tired to shop but still want something homemade that feels special.
Step-by-step instructions for Grandma's dinner rolls
Here's how to create tender, golden dinner rolls with a crisp exterior and fluffy interior.
Activate the Yeast with Warm Milk and Sugar
In a small bowl, combine the 0.75 cup whole milk warmed to 110°F (use a thermometer to check) with the 0.25 cup granulated sugar. Sprinkle the 0.25 oz active dry yeast over the top and let it sit for 5-10 minutes until it becomes frothy. This step ensures your yeast is alive and ready to work—if it doesn't bubble, your rolls won't rise properly.
I always test the milk temperature first by sprinkling a pinch of yeast into it. If it foams within 2 minutes, it's ready. Too hot milk kills yeast, and too cold milk won't activate it. Once bubbly, proceed immediately to the next step before the yeast loses its energy.
Mix the Dough and Knead Until Smooth
In a large bowl, whisk together the 5 cups all-purpose flour and 1.5 tsp kosher salt. Make a well in the center and pour in the yeast mixture, 1 whole large egg, and 0.5 cup cold unsalted butter cut into small cubes. Using a wooden spoon, stir until the dough begins to come together.
Turn the dough out onto a lightly floured surface and knead for 8-10 minutes until smooth and elastic. You'll know it's ready when it springs back when poked and doesn't stick to your fingers. This kneading develops gluten, which gives the rolls their signature pillowy texture. If the dough feels too sticky, add flour 1 tablespoon at a time—but don't overdo it or the rolls will be dense.
Let the Dough Rise Until Doubled in Size
Lightly grease a large mixing bowl with 1 tablespoon vegetable oil, then place the dough inside. Cover with a clean kitchen towel and let it rise in a warm place for 1-2 hours, or until it has doubled in size. A good test is to poke the dough gently—if it springs back slowly, it's ready.
I place my bowl on top of my oven with the light on (the light generates gentle heat) for consistent rising. Avoid cold drafts, which slow fermentation. Once doubled, the dough will feel light and airy. Patience here is key—rushing the rise makes for dense, flavorless rolls. If your kitchen is cold, extend the rising time to 2-3 hours for best results.
Shape and Proof the Rolls
Punch down the risen dough to release air, then divide it into 12 equal pieces (about 2 ounces each). Roll each piece into a smooth ball, dimpling the top slightly with your finger. Arrange the rolls in a greased 9x13-inch baking dish, leaving 1 inch between them for even browning.
Cover the dish with the kitchen towel and let the rolls proof for another 30-45 minutes until they've puffed up noticeably. This second rise is crucial for that signature softness. If your kitchen is warm, they may rise faster—keep an eye on them. Overproofing makes rolls flat and doughy, so aim for just until they look plump and almost touching.
Bake Until Golden and Crisp
Preheat your oven to 375°F. Sprinkle the rolls evenly with 0.5 cup coarse cornmeal—this creates a beautiful crust and prevents sticking. Bake for 18-22 minutes until the rolls are golden brown and sound hollow when tapped on the bottom.
The cornmeal gives them that rustic, bakery-style appearance while keeping them tender inside. For extra browning, brush the tops with a little melted butter after 15 minutes in the oven. Serve warm straight from the oven, and you'll have dinner rolls that taste like they came from Grandma's kitchen—soft, buttery, and irresistibly inviting.
Pro Tips For Making Grandma'S Dinner Rolls
- Use Warm Milk: That cold milk from the fridge will kill your yeast faster than a winter snowstorm. Heat it just until it’s warm to the touch—like bathwater—but not hot enough to make you wince. The yeast needs that cozy environment to wake up properly, and your rolls will rise twice as fast.
- Knead Until Silky: I used to stop kneading when the dough looked "done," but that’s how you end up with dense, chewy rolls. Keep going until it’s smooth and springs back when poked—about 8-10 minutes by hand. The gluten develops fully, and that’s what gives you those light, airy rolls Grandma’s recipe promises.
- Don’t Rush the Rise: Doubling the yeast to speed things up? Bad move. Let the dough rise in a warm spot (like a turned-off oven with a bowl of hot water inside) until it’s puffy and jiggly—about 1-1.5 hours. Rushing it means rolls that collapse or taste flat, and nobody wants that after all that work.
- Cut Butter Cold: Soft butter makes dough sticky and gummy, and your rolls will turn out greasy instead of flaky. Cut that unsalted butter into small cubes and keep it in the fridge until the last possible moment. When you fold it in, it’ll melt just enough to create those perfect layers—no more fighting dough that sticks to everything.
Flavor customization for this grandma's dinner rolls
Herb-Infused Rolls
Swap out plain butter for herb butter—mix ½ cup softened butter with 1 tbsp chopped fresh rosemary, 1 tbsp chopped thyme, and 1 tsp garlic powder.
Work this into the dough during kneading for a fragrant, savory twist. These rolls pair perfectly with roasted meats or hearty soups. 🌿
Garlic & Parmesan
Add 2 minced garlic cloves and ¼ cup grated Parmesan to the dough after mixing. The garlic infuses the rolls with bold flavor, while the cheese adds a salty depth. Brush baked rolls with garlic-infused olive oil for extra richness. This version is a crowd-pleaser at holiday dinners.
Sweet Cinnamon Rolls
Transform these into sweet rolls by adding 1 tbsp cinnamon and 2 tbsp brown sugar to the dough. After shaping, brush the tops with a mix of 2 tbsp melted butter and 1 tbsp honey.
Bake as directed, then drizzle with cream cheese glaze (mix ½ cup powdered sugar, 2 tbsp cream cheese, and 1 tbsp milk).
Cheesy Jalapeño
For a spicy kick, fold ½ cup shredded cheddar and 2 finely chopped jalapeños into the dough. The heat balances the creaminess of the cheese, creating rolls that are both bold and comforting. Serve with a side of cool ranch or sour cream for dipping. 🌶️
Everything Bagel Seasoning
Sprinkle 1 tbsp everything bagel seasoning (sesame seeds, poppy seeds, garlic, onion, and salt) on top of the rolls before baking. This adds a crunchy, savory crust that pairs beautifully with soups or sandwiches. For extra flavor, brush the tops with garlic butter after baking.
Honey & Walnut
Mix ½ cup chopped walnuts and 1 tbsp honey into the dough for a sweet, nutty variation. After baking, drizzle with melted honey butter (mix 2 tbsp butter and 1 tbsp honey). These rolls are perfect for breakfast or brunch, especially with a pat of butter and jam. 🍯
Nutrition facts
Frequently asked questions
Why do my homemade dinner rolls turn out dense instead of fluffy?
Dense rolls usually mean one of two things: under-kneaded dough or skipped proofing. Make sure to knead for 8-10 minutes until the dough springs back when poked. Also, never skip the 1-2 hour first rise or 30-45 minute second rise—these steps develop the airy texture. Cold kitchen? Extend rising time to 2-3 hours for best results.
Can I make these rolls ahead of time for a holiday dinner?
Shape the rolls and freeze them on a tray before baking. Once frozen, transfer to a bag for 3 months. To serve, bake straight from frozen at 375°F for 25-30 minutes until golden. For freshness, thaw overnight in the fridge before baking. This saves time on busy days while keeping them tender.
What's the best way to store leftover dinner rolls?
Keep them warm for 20 minutes in a covered basket. For longer storage, cool completely and place in an airtight container for 3 days at room temperature. Reheat at 350°F for 5-7 minutes until warm. For freezing, bake extra rolls, cool, then store in a bag for 3 months. Reheat from frozen at 350°F for 10-12 minutes.
Can I substitute butter with another fat for these rolls?
Yes, but texture may change slightly. Use ½ cup vegetable shortening for equal richness without browning, or ½ cup olive oil for a lighter taste. For flavor, try ½ cup Greek yogurt—it adds moisture and tang. Just note that butter creates the signature flaky layers and golden crust these rolls are known for.
How do I know when the rolls are fully baked?
Look for two key signs: the tops should be golden brown, and they should sound hollow when tapped on the bottom. Bake for 18-22 minutes at 375°F, but check at 18 minutes—ovens vary! If they brown too quickly, tent with foil. For extra browning, brush tops with melted butter after 15 minutes.