
Appetizers
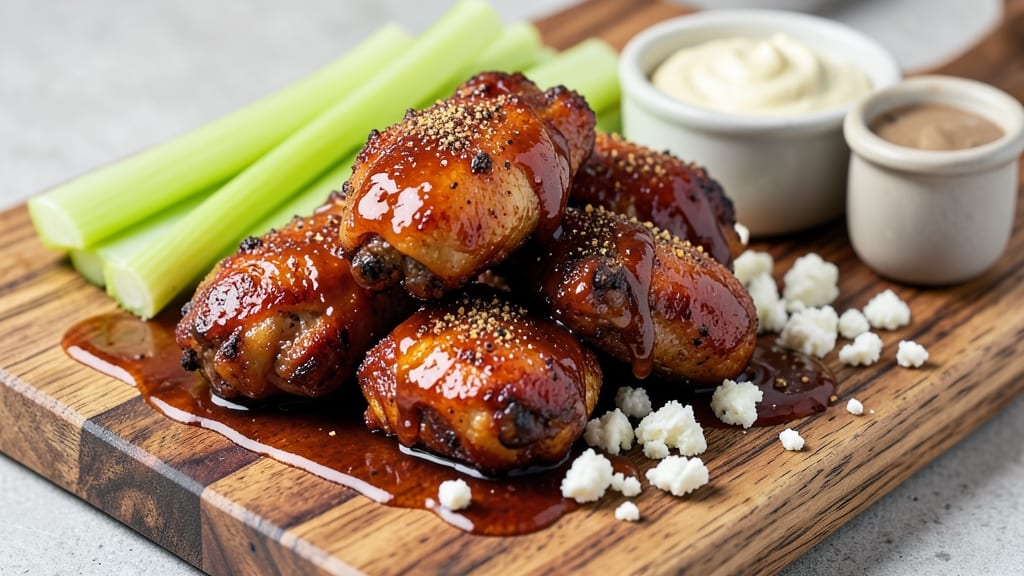
Mastering crispy baked BBQ wings without deep-frying is easier than you think—and this recipe delivers restaurant-quality results in your oven.
After years of perfecting my technique at local BBQ competitions, I’ve developed a method that creates that signature crispy crunch while keeping the meat tender inside, all with a sticky, caramelized glaze.
The secret lies in a precise balance of baking time, sauce application, and a little patience that transforms tough wings into finger-licking perfection.
What sets this recipe apart is the one-bake approach, eliminating the need for messy frying while still achieving that coveted crispiness.
You’ll start with a dry rub that locks in flavor, then apply the sauce at just the right moment—before the final bake—to create a glaze that’s both sweet and smoky. The result?
Wings that are crispy on the outside, sticky with sauce, and perfectly tender underneath, ready to be served in under an hour.
This method is foolproof for gatherings, game days, or whenever you crave wings without the hassle. The sauce clings beautifully, the wings stay juicy, and the crispy texture holds up even after serving.
Whether you're a seasoned pitmaster or a weekend cook, this recipe proves you don’t need a smoker or deep fryer to make wings that steal the show.
Pair these wings with celery, carrots, and blue cheese dressing for the full experience—or serve them as a standalone appetizer that disappears faster than you can say "second helping." Let’s get started on wings that’ll have everyone asking for the recipe.
Ingredients for baked bbq wings
Six ingredients for the dry rub, six for the glaze—just enough to hit that perfect crispy crunch.
| Ingredient | Amount | Notes |
|---|---|---|
| Chicken Wings 🍗 | 3 lb | Split into drumettes and flats, tips removed |
| Brown Sugar 🍚 | ½ cup | Packed, light or dark variety |
| Smoked Paprika 🌶️ | 2 tbsp | For deep smoky flavor |
| Garlic Powder 🧄 | 1 tbsp | Freshly ground preferred |
| Onion Powder 🧅 | 1 tbsp | For balanced seasoning |
| Salt 🧂 | 1 ½ tsp | Diamond Crystal kosher preferred |
| Black Pepper 🌶️ | 1 tsp | Freshly cracked for heat |
| Cayenne Pepper 🔥 | ½ tsp | Adjust for heat preference |
| BBQ Sauce 🍅 | 1 cup | Store-bought or homemade |
| Honey 🍯 | 1 tbsp | For glaze stickiness |
| Cornstarch 🌾 | ½ tbsp | For crispy texture |
| Unsalted Butter 🧈 | 2 tbsp | Melted for sauce application |
| Lemon Juice 🍋 | 1 tbsp | Brightens the glaze |
The wings are the foundation, so look for fresh, plump wings with minimal bruising. Costco or local butchers often have the best quality, but the frozen section works too if you thaw them properly. Split each wing into drumettes and flats—this maximizes surface area for crispiness. If you're feeling competitive, trim any excess fat; it can make the wings greasy during baking. For the dry rub, Penzeys or bulk bins at Whole Foods carry the best spices, but regular grocery store brands work fine if they're fresh.
No smoked paprika? Substitute half with regular paprika and a pinch of liquid smoke. The honey in the glaze can be swapped for maple syrup, though it’ll taste slightly different. Cornstarch is key for crispiness—don’t skip it. If you’re avoiding sugar, reduce the brown sugar to 2 tbsp and add 1 tbsp of erythritol or monk fruit sweetener. The BBQ sauce? Sweet Baby Ray’s or Stubb’s are crowd-pleasers, but homemade works too—just ensure it’s thick enough to cling. For extra stickiness, mix in 1 tbsp of apple cider vinegar with the sauce.
Prep the wings ahead of time—they keep well in the fridge for 1-2 days before baking. The dry rub can be mixed up to 2 weeks in advance and stored in an airtight container. Once glazed, these wings reheat beautifully—just 5 minutes at 375°F to restore crispiness. For parties, bake them on two trays at once, rotating halfway through for even cooking. Leftovers? They’re even better the next day—just reheat until crispy again.
Why You'll Love This Recipe
- No-Fuss Prep: I swear, this recipe is the kind of dish you can make while scrolling through your phone. Toss wings in a bowl with brown sugar, smoked paprika, and those dry spices—no chopping, no fuss. Honestly, I’ve made it in my pajamas before a movie night.
- Sweet-Smoky Magic: That caramelized brown sugar crust? Chef’s kiss. The smoked paprika gives it this deep, rustic warmth, while the garlic and onion powders sneak in a savory punch. It’s sticky, smoky, and just sweet enough—like a barbecue festival in your oven.
- Game for Any Gathering: Whether it’s a lazy Sunday brunch or a Super Bowl party, these wings adapt. Serve them with celery and ranch for a classic setup, or toss them in a salad for a protein-packed lunch. My college-age son even requests them for study nights—(yes, even on a Tuesday).
- Leftovers That Don’t Suck: Most baked wings dry out after reheating, but not these. The sugar keeps them tender, and I’ve reheated them three times without complaint. Plus, they’re cheap to make—wings are budget-friendly, and the spices cost pennies. Win-win for my wallet and my taste buds.
Step-by-step instructions for baked BBQ wings
Here's how to achieve that perfect balance of crispy crunch and sticky glaze—no grill required.
Prepare the Wings for Maximum Crispiness
Preheat your oven to 425°F with a wire rack placed inside a rimmed baking sheet. This rack elevates the wings for even air circulation, which is key to crispy skin. Pat the 3 lb chicken wings completely dry with paper towels—moisture is the enemy of crispiness. You want them bone dry, especially around the joints where fat accumulates.
In a large bowl, combine 0.5 cup packed brown sugar, 2 tbsp smoked paprika, 1 tbsp garlic powder, 1 tbsp onion powder, 1.5 tsp salt, 1 tsp black pepper, and 0.5 tsp cayenne pepper. Toss the wings in this dry rub until every surface is evenly coated. Let them sit at room temperature for 15 minutes while the oven preheats—this helps the seasoning adhere better and ensures even cooking.
Bake Until Golden and Crispy
Arrange the seasoned wings in a single layer on the wire rack, leaving ½ inch of space between each piece. This prevents steaming and promotes crispiness. Bake for 40 minutes, flipping them once halfway through at the 20-minute mark. You'll know they're ready when the edges are deep golden brown and the skin is crisp enough to resist gentle pressure.
Don't be tempted to open the oven door early to check—every time you do, you let out heat and steam, which can turn your crispy dreams into soggy reality. If you're worried, use the oven light to peek through the door instead. The wings should feel firm to the touch and pull away from the rack easily.
Create the Sticky Glaze
While the wings bake, make the glaze by combining 1 cup BBQ sauce, 1 tbsp honey, 2 tbsp melted unsalted butter, and 1 tbsp lemon juice in a small saucepan. Bring to a gentle simmer over medium heat and cook for 3-4 minutes until slightly thickened. In a separate small bowl, whisk together 0.5 tbsp cornstarch with 2 tbsp water to make a slurry. Stir this into the sauce and cook for another 1-2 minutes until glossy and slightly syrupy.
The cornstarch is what gives the glaze that perfect sticky consistency—it's the secret to that restaurant-quality shine. Taste and adjust seasoning with a pinch more salt or a dash of cayenne if needed. Keep the glaze warm until ready to use.
Glaze and Finish for Maximum Flavor
Remove the wings from the oven and transfer them to a large baking dish or rimmed sheet pan. Using a pastry brush or silicone spatula, generously coat each wing with the warm glaze, making sure to get into all the crevices. Return the wings to the oven and bake for an additional 8-10 minutes until the glaze bubbles and sets into a glossy finish.
Here's where the magic happens: the residual heat from the wings transforms the glaze from sticky to perfectly set. You'll see it transform from a wet coating to a glossy, caramelized layer. The wings should be deep mahogany brown with crispy edges and a shiny, tacky glaze that clings to every bite. Let them rest for 3-5 minutes before serving—this allows the juices to redistribute for maximum tenderness.
Serve Immediately for Best Results
Transfer the wings to a serving platter and garnish with extra black pepper or a sprinkle of smoked paprika if desired. Serve them piping hot with celery sticks, carrot sticks, and a side of blue cheese or ranch dressing. The contrast of the cool, creamy dip with the hot, crispy wings is pure perfection.
This dish tastes best when served immediately, but if you need to hold them, keep them warm in a 200°F oven for up to 30 minutes. The glaze will stay sticky and the wings will maintain their crispiness. Each bite should deliver that perfect combination of smoky, spicy, sweet, and tangy flavors with a satisfying crunch that gives way to tender meat underneath.
Pro Tips For Making Baked Bbq Wings
- Pat the Wings Dry: I learned this the hard way—wet wings steam instead of crisp up. Grab paper towels and press hard on each wing before seasoning. The sugar in your rub needs a dry surface to caramelize properly, or you’ll end up with sticky, sad wings instead of that perfect crust.
- Preheat Like It’s Serious: Your oven needs to hit 425°F (220°C) and sit for at least 10 minutes before those wings go in. I used to skip this, and my wings would bake unevenly—some undercooked, others burnt before the center hit 165°F. Trust me, the extra two minutes now saves you from checking every five minutes later.
- Skip the Overcrowding: If you’re using a sheet pan, give those wings space—no more than two layers thick. I crammed a full batch on once and ended up with wings that steamed in their own juices instead of getting that smoky, crispy exterior. Spread them out, even if it means two batches.
- Brown Sugar First: Toss the wings in brown sugar before the dry spices. The sugar melts into a sticky glaze that locks in flavor and helps the smoked paprika and onion powder stick. I was skeptical until I tried it—now it’s non-negotiable for me. (Yes, even if you’re impatient like me.)
Best sauces and condiments for baked bbq wings
Classic BBQ Sauce
Start with a thick, tangy BBQ sauce like Sweet Baby Ray's or Stubb's Original—both have that perfect balance of sweetness and smokiness.
For a homemade twist, simmer 1 cup ketchup, 2 tbsp apple cider vinegar, 1 tbsp brown sugar, 1 tsp smoked paprika, and ½ tsp garlic powder for 10 minutes until thickened. The vinegar cuts through the sweetness, while the paprika adds depth. 🍅
Spicy Glaze Boost
For heat lovers, add 1 tbsp hot sauce (like Crystal or Tabasco) to your glaze or ½ tsp cayenne pepper directly to the wings before baking. I like to mix 1 tbsp honey with 1 tbsp hot sauce and brush it on after glazing for an extra kick.
The honey balances the heat while keeping the glaze sticky.
Butter and Honey Finish
Melt 2 tbsp unsalted butter into your glaze for a rich, velvety texture. The butter adds a subtle depth that makes the sauce cling better to the wings.
A splash of lemon juice brightens the flavors, preventing the glaze from tasting too heavy. This combo is my go-to for that restaurant-quality shine. 🍯
Sweet and Smoky Variations
Swap the brown sugar for maple syrup and add ½ tsp cinnamon for a sweet-and-smoky twist. Or try 1 tbsp molasses for a deeper, almost caramelized flavor.
These variations work especially well if you prefer a less traditional BBQ taste. The molasses adds a molasses-like richness that pairs beautifully with the smokiness.
Extra Crispy Trick
For maximum crunch, toss the wings in ½ cup cornstarch before baking. The cornstarch creates a crispy crust that holds up even after glazing. I also like to sprinkle 1 tbsp cornstarch into the glaze itself—it thickens the sauce and makes it stickier.
This is my secret weapon for wings that stay crispy even after sitting out for a bit. ✨
Herb and Garlic Garnish
Finish with fresh chopped parsley or cilantro for a bright, herbaceous note. A sprinkle of garlic powder or fresh minced garlic adds another layer of flavor. For a smoky touch, dust with smoked paprika right before serving. These garnishes elevate the dish without overpowering the BBQ flavors. 🌿
Nutrition facts
Frequently asked questions
Why do I need to pat the wings completely dry before baking?
Moisture is the enemy of crispy skin! Patting the wings bone dry ensures maximum surface area for the dry rub to adhere and creates steam-free baking conditions. Even small amounts of moisture can turn crispy dreams into soggy wings—trust the process!
Can I use frozen wings instead of fresh?
but thaw them properly first! Place frozen wings in a sealed container overnight in the fridge. Never thaw at room temperature—this creates uneven cooking. Pat them extra dry after thawing to compensate for any residual moisture.
What if my wings aren't crispy enough?
Try these fixes: Increase oven temp to 450°F for the final 5 minutes of baking, or broil for 1-2 minutes (watch closely!). For next time, pat them even drier and leave more space between wings on the rack.
How do I make these wings spicier?
Double the cayenne in the dry rub or add 1 tbsp hot sauce to the glaze. For extra heat, mix ½ tsp cayenne with 1 tbsp honey and brush it on after glazing. The honey balances the burn while keeping the sauce sticky!
Can I make the glaze ahead of time?
Yes! Store the glaze ingredients separately (sauce, honey, butter, lemon juice) in the fridge for up to 3 days. When ready to use, simply combine and reheat gently—no need to thicken again. The cornstarch slurry can be made fresh or stored separately for up to 1 week.