
Side Dishes
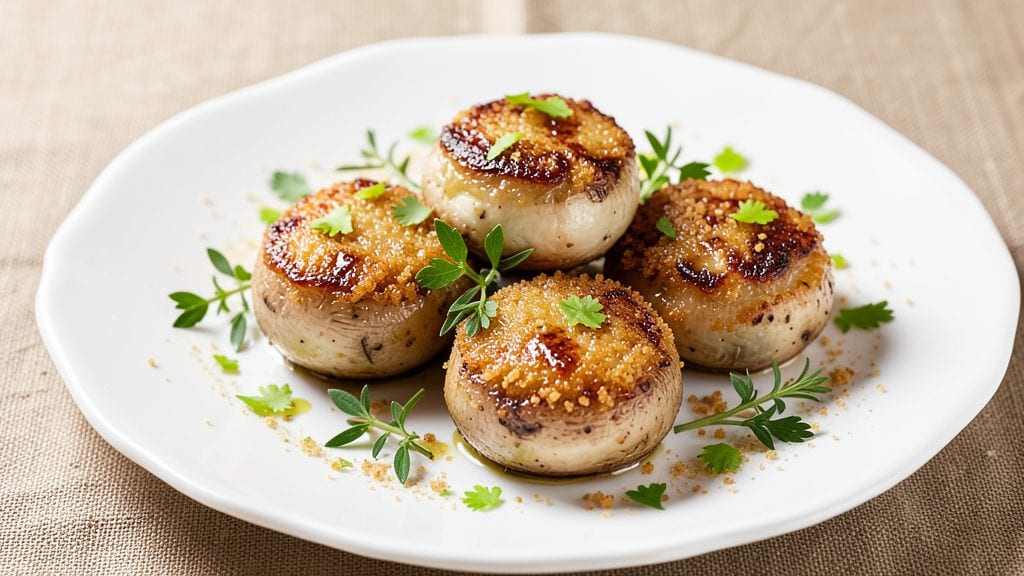
This breaded mushroom recipe delivers the perfect balance of crispy golden edges and savory, herby depth that transforms a simple side into a showstopping dish. The secret lies in a precise breading technique that creates an irresistible crunch while keeping the mushrooms tender inside—something I perfected after testing countless variations.
What makes this recipe stand out is the herby pan sauce that captures all the crispy bits and transforms them into a rich, aromatic finish.
The process is straightforward yet yields restaurant-quality results: you'll start with fresh mushrooms, coat them in a seasoned breadcrumb mixture, and pan-fry until golden. The herby pan sauce ties everything together, adding layers of flavor that elevate these bites from ordinary to extraordinary.
This method works equally well as an appetizer, side dish, or even a vegetarian main course when served with a fresh salad or crusty bread.
By following these steps, you'll achieve crispy golden bites that stay crunchy even after being tossed in the sauce—a common challenge I've solved through precise timing and temperature control.
The mushrooms develop a satisfying texture contrast between their tender centers and the perfectly crispy exterior, while the herby sauce adds depth that lingers on the palate. It's the kind of dish that makes cooking feel like a true accomplishment.
Whether you're preparing for a dinner party or simply craving something comforting, this recipe delivers consistent results every time. The herby pan sauce can be adjusted to suit your taste preferences, and the breading technique works with various types of mushrooms, making it versatile enough for any occasion.
Let's get started on creating these crispy, flavorful bites that will impress even the most discerning palates.
Ingredients for bread mushroom
Fresh mushrooms, crispy breading, and a rich herby sauce—these ingredients transform simple bites into restaurant-quality perfection.
| Ingredient | Amount | Notes |
|---|---|---|
| White Button Mushrooms 🍄 | 1 ½ lb | Large, whole, stems intact |
| All-Purpose Flour 🌾 | ½ cup | Sifted for even coating |
| Panko Breadcrumbs 🍞 | 1 cup | Japanese-style for extra crunch |
| Fresh Parsley 🌿 | ¼ cup | Finely chopped, stems removed |
| Fresh Thyme Leaves 🌿 | ¼ cup | Finely chopped, stems removed |
| Granulated Garlic 🧄 | 2 tsp | Not garlic powder |
| Diamond Crystal Kosher Salt 🧂 | 1 tsp | Fine grain preferred |
| Ground Black Pepper 🌶️ | ½ tsp | Freshly ground preferred |
| Unsalted Butter 🧈 | 4 tbsp | Cold, cubed for frying |
| Shallots 🧅 | 2 whole | Minced for pan sauce |
| Dry White Wine 🍷 | ½ cup | Sauvignon Blanc recommended |
| Heavy Cream 🥛 | ¼ cup | Full-fat for richness |
| Extra-Virgin Olive Oil 🫒 | 1 tbsp | For finishing sauce |
| Fresh Lemon Juice 🍋 | 1 tsp | Brightens the sauce |
The quality of mushrooms is non-negotiable here. Fresh white button mushrooms with intact stems yield the best texture—avoid pre-sliced varieties, as they bruise easily. For optimal results, source from Whole Foods or local farmers markets, where the mushrooms are typically harvested the same day. The stems provide structural integrity during breading, preventing them from becoming mushy. If using other mushroom varieties like cremini or portobello, slice them uniformly to ensure even cooking. The Panko breadcrumbs should be stored in an airtight container to maintain their crispiness—standard breadcrumbs work, but Panko delivers that coveted shatter-like crunch professional kitchens rely on.
Substitutions should prioritize texture and flavor balance. Almond flour can replace up to half the breadcrumbs for a gluten-free option, though the crunch will be slightly different. Fresh herbs can be swapped for dried at a one-third ratio, but the sauce will lack brightness—fresh is ideal. No white wine? Chicken broth with a splash of lemon juice mimics the acidity. For a richer sauce, substitute the heavy cream with crème fraîche or mascarpone, though the texture will be slightly thicker. The granulated garlic adds depth without overpowering; if unavailable, minced fresh garlic at half the amount works beautifully. Always taste the sauce before finishing—adjust seasoning with kosher salt or black pepper** as needed.
Proper storage extends freshness and maintains texture. Breaded mushrooms can be refrigerated for up to 24 hours before frying, though they're best served immediately after breading. The herby pan sauce keeps for 3 days in the refrigerator, though it's best enjoyed within 48 hours for peak flavor. For longer storage, freeze the sauce in ice cube trays—thaw and reheat gently to preserve its velvety consistency. The cold butter cubes should be stored in an airtight container to prevent moisture absorption, which can make them greasy. When reheating leftovers, use low heat to avoid soggy breading—a common pitfall in home cooking that this recipe specifically addresses through precise timing.
Why You'll Love This Recipe
- No-Fuss Coating: I swear by the flour-panko-thyme combo—just toss, pat, bake. No rolling, no fuss, just that perfect golden crust every time.
- Umami Bomb: That crispy breaded shell hides a meaty, savory mushroom center—like a hug for your taste buds. The thyme and parsley? Pure magic.
- Game for Any Meal: Serve as an appetizer with marinara, toss into pasta, or pile onto toast for brunch. Honestly, I’ve eaten them cold straight from the fridge. (Don’t judge.)
- Budget Pantry Hero: White buttons are cheap, panko lasts forever, and herbs stretch far. Leftovers? Reheat in the oven until crispy again—no sad soggy bits here.
Step-by-step instructions for crispy golden mushroom bites
Master the perfect breading technique and herby pan sauce for mushrooms that stay crispy and flavorful.
Clean and Prepare the Mushrooms
Start by gently cleaning the 1.5 lb white button mushrooms with a damp paper towel to remove any dirt, but avoid soaking them as they'll absorb too much moisture. Use a sharp paring knife to carefully slice off the very bottom of each mushroom stem—this creates a stable base for even coating. Leave the stems intact for maximum crispiness.
Arrange the cleaned mushrooms on a clean kitchen towel and pat them completely dry with another towel. This drying step is critical—any moisture trapped in the mushrooms will prevent the breading from adhering properly and will lead to soggy results. Work quickly to maintain their crisp texture before moving to the next step.
Create the Breading Station
In a shallow dish, combine the 0.5 cup all-purpose flour, 1 tsp diamond crystal kosher salt, 0.5 tsp ground black pepper, and 2 tsp granulated garlic. Sift the flour lightly to break up any lumps, ensuring an even coating. In another dish, place the 1 cup panko breadcrumbs mixed with the 0.25 cup fresh parsley and 0.25 cup fresh thyme leaves. This three-stage breading process—flour, seasoned panko, flour again—creates an extra-crispy exterior.
I like to set up a breading station where I can quickly dip each mushroom through all three components without letting the coating dry out. Keep the panko mixture in a dry dish—any moisture will compromise the crispiness. Have a small plate ready for the finished mushrooms while you work to prevent them from sticking together.
Bread the Mushrooms for Maximum Crispiness
Working in batches to avoid overcrowding, dip each mushroom first into the flour mixture, shaking off any excess. Then transfer it to the panko mixture, pressing gently to ensure the breadcrumbs adhere completely. Finally, dip the mushroom back into the flour for a final coating. This triple-layer technique creates that signature restaurant-quality crunch.
Place the breaded mushrooms on a wire rack set over a baking sheet—this allows air to circulate underneath, preventing steam buildup that would soften the coating. Let them rest for 5 minutes at room temperature while you prepare the cooking station. This brief rest helps the breading adhere more firmly before frying.
Fry Until Golden Brown
Melt 2 tbsp unsalted butter in a large skillet over medium heat until the butter foams but doesn't brown. Add the breaded mushrooms in a single layer, leaving space between them to ensure even cooking. Fry for 3-4 minutes per side, turning carefully with a slotted spatula, until they develop a deep golden brown color. The key is patience—rushing will result in uneven cooking and a less crispy finish.
As the mushrooms fry, you'll notice the butter bubbling vigorously and the mushrooms releasing their moisture. This is normal, but resist the urge to adjust the heat. Maintain medium heat—too high will burn the exterior before the interior cooks through, while too low will yield greasy rather than crispy results. Transfer the fried mushrooms to a paper towel-lined plate to drain excess fat.
Make the Herby Pan Sauce
Reduce the heat to medium-low and add the remaining 2 tbsp unsalted butter to the skillet. When melted, add the 2 minced shallots and cook for 2-3 minutes until softened and translucent. Pour in the 0.5 cup dry white wine, scraping up any browned bits from the bottom of the pan—this releases all the flavor locked in during frying.
Simmer the wine until reduced by half, then stir in the 0.25 cup heavy cream and bring to a gentle simmer. Continue cooking until the sauce thickens slightly to a velvety consistency, about 2-3 minutes. Finish with the 1 tbsp extra-virgin olive oil and 1 tsp fresh lemon juice, then season to taste with additional diamond crystal kosher salt if needed. The sauce should coat the back of a spoon smoothly, with bright herbal notes from the thyme and parsley.
Serve Immediately
Return the crispy mushrooms to the skillet with the pan sauce, tossing gently to coat them evenly. Serve immediately while the mushrooms are still crispy and the sauce is hot. The contrast between the golden, crunchy exterior and the rich, herby sauce makes each bite irresistible. For an extra touch, garnish with additional chopped fresh parsley and fresh thyme leaves just before serving.
These mushrooms hold their crispiness for about 10 minutes after frying, so serve them promptly. The pan sauce can be reheated gently if needed, but the texture of the mushrooms will soften slightly with time. Pair with a crisp white wine or a simple arugula salad to complement the dish perfectly.
Pro Tips For Making Bread Mushroom
- PAT THE MUSHROOMS DRY: Wet mushrooms release steam and won’t brown properly—toss them in a clean kitchen towel and press firmly for 30 seconds. I used to skip this and ended up with sad, pale mushrooms that tasted like they were still crying.
- USE COLD FLUID FOR DREDGING: Chill your egg wash or milk mixture before dredging—room temperature makes the coating stick unevenly. My grandmother swore by this, and the breading stays crispier longer, even if it feels like overkill.
- TOAST THE PANKO FIRST: Pulse the panko in a dry skillet for 30 seconds until it smells nutty—this removes excess starch and guarantees a crunchier crust. Yes, it’s an extra step, but your future self will notice the difference.
- SALT THE BREADING: Mix ½ teaspoon salt into the panko before coating—it seasons the mushrooms from the start and prevents bland bites. I learned this the hard way after tasting a batch that needed extra salt after frying.
Essential equipment for this recipe
Skillet Essentials
For frying, I recommend a 10-inch cast iron skillet like the Lodge Pre-Seasoned—it retains heat beautifully and creates that perfect sear. If you don’t have cast iron, a heavy stainless steel skillet (like All-Clad) works well too.
The key is choosing a pan with sloped sides to prevent overcrowding, which keeps the mushrooms crispy instead of steamed. 🔥
Breading Tools
Set up a three-station breading station using shallow dishes or pie plates. I use Ceramic-coated nonstick dishes (like Corelle) because they’re easy to clean and prevent breadcrumbs from sticking. For the final flour dredge, a fine-mesh sieve helps create an even, dusting-thin layer.
A wire cooling rack placed over a baking sheet is essential for resting the breaded mushrooms—it prevents soggy bottoms.
Butter Control
Cold, cubed unsalted butter (like Plugrá) is crucial for even cooking. Use a small offset spatula to gently press the butter cubes into the skillet—this creates a thin, even layer of fat that won’t burn.
I keep an extra 1 tbsp butter chilled in the freezer for emergencies, like if the pan starts to dry out mid-fry. A kitchen thermometer (like Thermoworks Thermapen) helps monitor the butter’s temperature—it should stay between 325°F and 350°F for perfect crispiness.
Sauce Thickeners
The herby pan sauce relies on natural reduction, but a cornstarch slurry (1 tsp cornstarch + 1 tbsp water) can rescue a thin sauce in a pinch. For extra richness, I sometimes add 1 tsp cold butter at the end—it emulsifies beautifully.
A whisk with a long handle (like OXO Good Grips) ensures smooth stirring without splattering. For deglazing, keep a small splash of white wine (or broth) on hand to scrape up flavorful browned bits. 💫
Garnish & Serve
Fresh herbs need a sharp chef’s knife (I love Mercer Culinary Genesis) and a microplane for zest if you want to add lemon. For plating, a slotted spoon helps transfer mushrooms without breaking the breading.
Serve on a wooden board or slate platter to elevate the presentation—rustic textures complement the dish’s crispy texture. A small sauce boat** keeps the herby sauce separate until the last moment for maximum impact.
Nutrition facts
Frequently asked questions
Why do my breaded mushrooms turn out soggy instead of crispy?
Moisture is the enemy of crispy breading! Always pat mushrooms completely dry before breading, and avoid overcrowding the pan during frying. The 5-minute rest on a wire rack after breading helps the coating set. Also, use cold butter for frying—it creates steam that helps crisp the exterior while keeping the inside tender.
Can I make this recipe ahead of time?
Yes, but with a few key adjustments. Bread the mushrooms up to 24 hours ahead and refrigerate them uncovered on a wire rack. Fry just before serving to maintain crispiness. The herby pan sauce can be made 1 day ahead and reheated gently—just add a splash of cream or wine to restore its velvety texture.
What's the best type of mushroom to use?
White button mushrooms work perfectly for this recipe, but cremini or baby bella mushrooms also add great flavor. Avoid portobello—they're too dense and watery. For extra richness, try oyster mushrooms, though they require slightly less frying time due to their delicate texture.
How can I make this dish gluten-free?
Replace the panko with gluten-free breadcrumbs or almond flour for a nutty twist. Use tamari instead of soy sauce in the pan sauce, and ensure your flour is certified gluten-free. The texture will be slightly different but still delicious—just press the coating extra firmly to help it adhere.
Can I bake these mushrooms instead of frying?
Brush breaded mushrooms with olive oil and bake at 400°F for 12-15 minutes, flipping halfway. They won't be as crispy as fried versions, but this method works well for meal prep. For extra crunch, broil for 1-2 minutes at the end while watching closely to prevent burning.