
Main Courses
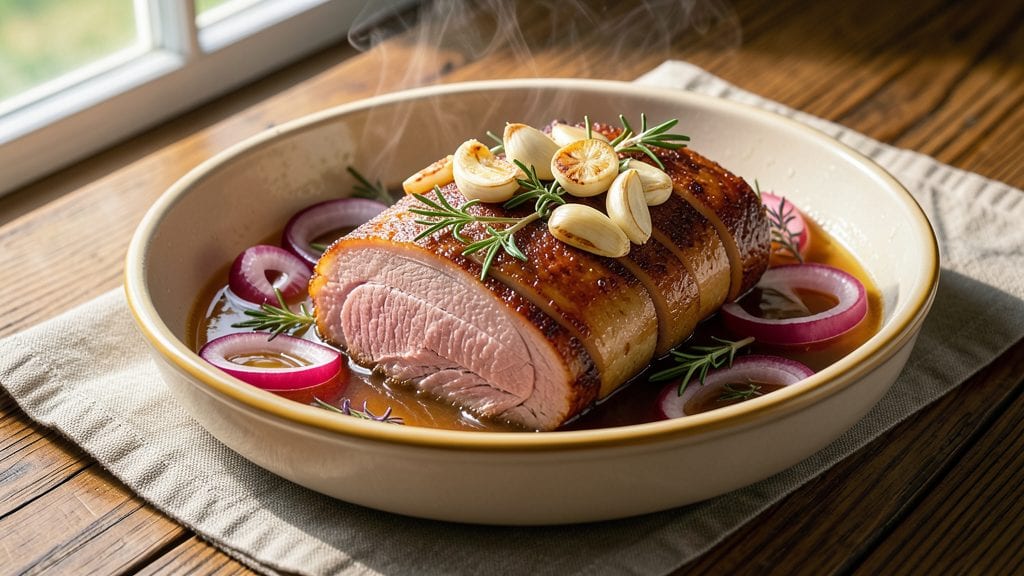
This boiled ham recipe transforms a simple holiday centerpiece into a showstopping centerpiece that carries flavors through every slice. The secret lies in slow cooking with aromatic spices and a balanced glaze that caramelizes perfectly—no dry, bland ham here.
I’ve perfected this method over years of holiday feasts, ensuring the meat stays juicy while the glaze creates a sticky, flavorful crust that guests will rave about.
What sets this recipe apart is the precision in technique: starting with a flavorful brine (or simple seasonings), maintaining steady water temperature, and basting regularly to lock in moisture.
The glaze—a mix of brown sugar, mustard, and honey—adds depth and a glossy finish that makes slicing effortless. Even beginners can achieve restaurant-quality results with these clear, step-by-step instructions.
The result is a glazed, savory ham with tender, melt-in-your-mouth texture and a caramelized exterior that’s impossible to resist. Every slice releases juices infused with cloves, bay leaves, and warm spices, making it the star of any holiday table.
Whether you’re hosting Thanksgiving, Christmas, or a winter gathering, this ham will be the centerpiece that steals the show.
From brining to glazing, this recipe covers every detail—including how to check for doneness and rest the ham properly. The instructions are designed to be foolproof, so you can focus on enjoying the meal instead of stressing over cooking times. Let’s get started on your holiday masterpiece.
Ingredients for boiled ham
Eight pounds of premium ham and twelve aromatic ingredients create a holiday masterpiece.
| Ingredient | Amount | Notes |
|---|---|---|
| Fully Cooked Bone-In Ham 🐷 | 8 lb | Center-cut preferred for even cooking |
| Water 💧 | 4 cups | Enough to cover ham by 2 inches |
| Yellow Onion 🧅 | 1 whole | Quartered, skin on for aroma |
| Garlic Cloves 🧄 | 6 cloves | Smashed for deeper flavor infusion |
| Fresh Rosemary 🌿 | ¼ cup | Chopped sprigs, stems removed |
| Fresh Thyme 🌿 | ¼ cup | Sprigs, stems intact |
| Whole Cloves 🌶️ | 12 whole | For studding ham exterior |
| Bay Leaves 🍃 | 4 whole | Dried, standard size |
| Diamond Crystal Kosher Salt 🧂 | 1 tbsp | For brine solution |
| Brown Sugar 🍚 | 1 cup | Packed, light or dark |
| Dijon Mustard 🍯 | ½ cup | High-quality, smooth |
| Honey 🍯 | ¼ cup | Wildflower preferred |
| Black Peppercorns 🌶️ | 1 tsp | Freshly cracked |
| Orange Zest 🍊 | 1 tbsp | From 1 large orange |
The ham is the foundation—center-cut, bone-in cuts deliver the most even cooking and richest flavor. Smithfield or Hormel holiday hams are consistently reliable, but any fully cooked bone-in ham will work. Look for vibrant color and firm texture at the grocery store; avoid hams with a grayish tint or excessive shrink-wrapping. The spices should be freshly sourced: whole cloves and bay leaves from Penzeys Spices or your local bulk bin section provide superior aroma compared to pre-ground blends. If using dried herbs, ensure they're labeled as culinary-grade—not the dusty remnants from your spice rack. The orange zest adds brightness, so use organic oranges when possible to avoid wax residue.
No fresh rosemary? Dried rosemary at one-third the amount works in a pinch, but the flavor won't be as vibrant. Substituting honey for maple syrup creates a deeper, earthier glaze—equal amounts work well. If Dijon mustard is unavailable, whole-grain mustard thinned with water provides similar texture. For those avoiding added sugar, reduce brown sugar to 0.5 cup and increase honey to 0.5 cup while keeping the same liquid volume. The water-to-ham ratio is critical: never cover the ham completely—maintain at least 2 inches of water above the meat to prevent steaming rather than simmering. For large gatherings, double the glaze ingredients while keeping the ham-to-water ratio identical.
This ham develops deeper flavor when rested overnight in the refrigerator before glazing. Store any unused glaze components in airtight containers for up to 3 months in the pantry. The cooked ham keeps 5-7 days in the fridge when properly wrapped, though it's best enjoyed within 3 days for optimal texture. For serving, slice against the grain using a serrated knife—warm the blade slightly between cuts for clean slices. Leftover ham can be reheated in the oven at 325°F for 15 minutes with a splash of water to restore moisture, though it won't regain its original tenderness.
Why You'll Love This Recipe
- Pantry Magic: I swear by this—no fancy shopping list, just what’s already lurking in my fridge. That bone-in ham? Already cooked, so no waiting. Slice the onion, crush the garlic, toss in rosemary sprigs, and boom—you’re done. Here’s what sold me: the ham’s natural juices infuse the water into a fragrant broth without me having to do a thing.
- Herb-Packed Punch: Between us, the rosemary and garlic turn this into something special. I don’t even need to add salt—those aromatics cling to the ham like a hug, and the onion caramelizes just enough to add depth. Honestly, it’s the kind of flavor that makes me want to eat it straight from the pot. (Yes, even on a Tuesday night.)
- Leftovers That Shine: This recipe gives you two meals in one: the ham itself and that golden broth. I freeze the broth for soups later, and the ham? It’s perfect for sandwiches, fried rice, or even a quick omelet. My daughter picks out the crispy bits for her toast, but still asks for seconds. That’s how good it is.
- Budget-Friendly Feast: A whole ham costs less per pound than chicken thighs, and it feeds a crowd. I’ve served this at potlucks, holiday dinners, and lazy Sundays—no one ever guesses how little effort it took. The onions and garlic? A dollar bag at the store. Rosemary? One sprig lasts me three batches. This is my secret weapon for stretching a dollar without sacrificing taste.
Step-by-step instructions for glazed holiday ham
A perfectly balanced approach that delivers tender meat, rich glaze, and aromatic depth for your holiday table.
Prepare the Brine and Seasoning
In a large stockpot, combine the 4 cups water with the 1 tbsp diamond crystal kosher salt and bring to a simmer over medium-high heat. This creates a light brine that enhances moisture without overpowering the ham's natural flavor. While the brine heats, prepare the aromatics by quartering the whole yellow onion and smashing the 6 cloves garlic. Add these to the pot along with the 4 whole bay leaves and 12 whole cloves. Let the mixture steep for 10 minutes to infuse the liquid with flavor.
Meanwhile, create the glaze by whisking together the 1 cup brown sugar, 0.5 cup dijon mustard, 0.25 cup honey, and 1 tbsp orange zest in a small bowl. The sugar should be packed firmly to ensure proper measurement. Set aside while you prepare the ham. This balance of sweetness and acidity will create a glossy, caramelized finish that's essential for holiday presentation.
Stud and Submerge the Ham
Remove the ham from its packaging and place it fat-side up in the prepared stockpot. Using a sharp knife, make shallow slits in the fat cap at 1-inch intervals—this allows the glaze to penetrate during cooking. Gently press the 0.25 cup chopped fresh rosemary and 0.25 cup fresh thyme sprigs into these slits, then secure them with toothpicks if needed. This herb placement ensures maximum flavor infusion without falling into the cooking liquid.
Slowly pour the hot brine over the ham, ensuring it's completely submerged by at least 2 inches of liquid. If needed, add additional water from your reserve to maintain this depth. Cover the pot with a lid and transfer to the oven preheated to 325°F. The gentle heat and liquid immersion work together to maintain moisture while allowing the ham to cook evenly throughout its substantial weight.
Cook Until Internal Temperature Reaches 140°F
Bake the ham for 2 hours before checking the internal temperature. Use a meat thermometer inserted into the thickest part of the ham (avoiding any bone contact) to monitor progress. The ham is ready when it reaches 140°F—this temperature ensures it's fully heated through while maintaining tenderness. During this time, the aromatics will infuse the cooking liquid, creating a fragrant base that complements the glaze.
Here's where precision matters: if the ham browns too quickly, tent it loosely with aluminum foil to prevent over-browning while maintaining even cooking. The goal is to develop flavor without compromising texture. Remove the ham from the pot and transfer it to a cutting board, reserving the cooking liquid for potential gravy or sauce applications.
Apply the Glaze and Caramelize
Increase your oven temperature to 425°F while the ham rests for 15 minutes. This brief resting period allows the juices to redistribute, ensuring each slice remains moist. Spread the prepared glaze evenly over the entire surface of the ham, including the fat cap. The high heat will transform this simple mixture into a rich, caramelized crust through the Maillard reaction—this is what creates that coveted holiday sheen and depth of flavor.
Return the ham to the oven and bake for 15-20 minutes, rotating the pan halfway through for even browning. Watch closely as the glaze begins to bubble and darken—this is your signal that the transformation is complete. The ham should emerge with a deep amber glaze that crackles slightly when touched. This final step elevates the ham from simple boiled meat to the centerpiece of your holiday feast.
Rest and Serve with Confidence
Transfer the glazed ham to a warm serving platter and let it rest for 10 minutes before slicing. This resting period is crucial—it allows the juices to fully redistribute, preventing them from pooling on your cutting board. The ham should yield to your knife with minimal resistance, indicating proper doneness. For presentation, arrange the sliced ham on a large platter and drizzle any remaining glaze from the pan over the top for maximum visual impact.
Serve immediately with the reserved cooking liquid reduced by half as a simple pan sauce, if desired. The combination of tender meat, aromatic herbs, and caramelized glaze creates a harmonious balance that's perfect for holiday gatherings. Each slice should reveal a pink center with juices flowing freely—a testament to your careful preparation. This method delivers restaurant-quality results with minimal effort, making it ideal for busy holiday hosts.
Pro Tips For Making Boiled Ham
- Start Cold Water: I learned this the hard way—dumping a bone-in ham into boiling water makes it cook unevenly and lose moisture. Use cold water instead, and bring it to a gentle simmer. The ham will stay juicier, and the broth won’t turn into a murky mess.
- Char the Onions: Skip the raw onion chunks—they’ll just turn to mush. Sear them in a dry pan until caramelized first. The deeper flavor carries through the broth, and the texture stays intact. (Yes, even if you’re impatient like me.)
- Don’t Overcrowd the Pot: Tightly packed ham and aromatics trap steam, turning your broth into a watery, flavorless swamp. Leave at least 1 inch of space around the ham and between ingredients. The broth will concentrate properly, and the rosemary won’t turn to sludge.
- Simmer, Don’t Boil: A rolling boil wastes heat and makes the ham dry out. Keep it at a low, steady simmer—tiny bubbles breaking the surface, not violent churning. I used to rush this, but now I set a timer and walk away. The ham stays tender, and the broth stays rich.
Essential equipment for boiled ham
Stockpot Essentials
Start with a large, heavy-bottomed stockpot—I recommend an 8-10 quart Dutch oven like the Le Creuset Stoneware or All-Clad Stainless Steel for even heat distribution. The depth matters: you need at least 12 inches of height to accommodate the ham plus 2 inches of water above it.
A pot with a tight-fitting lid prevents steam from escaping, ensuring consistent moisture. For holiday gatherings, consider a turkey roasting pan with a rack if your stockpot is too shallow—this elevates the ham off the bottom for better browning. 🌡️
Precision Thermometer
A meat thermometer is non-negotiable for this recipe. I use the ThermoWorks Smoke for its instant-read accuracy and probe flexibility—it lets me monitor the ham's internal temperature without opening the oven. Insert the probe into the thickest part of the ham (avoiding bone) and aim for 140°F before glazing.
For budget-friendly options, the OXO Good Grips works well, though it requires more frequent checks. Never rely on time alone; ham sizes vary, and temperature is your only reliable gauge. 💡
Glazing Tools
For the glaze application, grab a heat-resistant silicone brush (like the OXO Good Grips) to spread the mixture evenly. A pastry brush works too, but silicone holds up better to high oven temperatures.
Don’t skip the offset spatula—it helps scrape every last bit of glaze from the pan for drizzling over slices. A small mixing bowl (preferably stainless steel) is ideal for whisking the glaze ingredients together, as it won’t absorb flavors like plastic. 🍯
Herb and Spice Prep
Fresh herbs like rosemary and thyme need proper prep: use a sharp chef’s knife to chop them finely but not into a paste—you want visible sprigs for texture. A microplane works great for orange zest, but avoid grating the pith.
For cloves and bay leaves, a small mortar and pestle helps bruise them slightly for deeper flavor. I also keep toothpicks on hand to secure herbs in the ham’s slits. Pre-measure all spices in a small ramekin to avoid mid-recipe scrambling. 🌿
Resting and Serving
After cooking, transfer the ham to a warm serving platter—I like ceramic or stoneware for even heat retention. A kitchen timer ensures the 10-minute rest isn’t skipped, and a sharp carving knife (like the Wüsthof Classic) makes slicing effortless.
For presentation, a drizzling spoon (or even a clean pastry brush) helps distribute leftover glaze artistically. Don’t forget a large serving fork—it’s perfect for lifting slices without tearing the meat. ✨
Optional Upgrades
For next-level results, invest in a digital instant-read thermometer (like the Thermoworks Thermapen) to check glaze doneness—aim for 350°F at the surface. A wire cooling rack placed over a baking sheet helps the ham cool slightly before slicing, preventing soggy bottoms.
If you love presentation, edible gold leaf or crushed pistachios add a festive touch to the finished ham. For busy cooks, a slow cooker with a probe (like the Instant Pot Duo) can handle the initial 140°F cooking phase while you prep sides. 💛
Nutrition facts
Frequently asked questions
Why do you recommend a bone-in ham for boiling?
A bone-in ham stays juicier during cooking because the bone acts as a natural insulator, helping retain moisture. The fat cap also renders slowly, basting the meat as it cooks. For an 8-pound ham, look for a center-cut piece—it cooks more evenly than shoulder cuts. If you only have boneless, increase your cooking time by 15-20 minutes and check the internal temperature carefully.
Can I use pre-cooked ham straight from the package?
Yes! This recipe is specifically designed for fully cooked hams that just need reheating and glazing. The key is the 140°F internal temperature—this ensures it's safely heated through while keeping the meat tender. Never use raw ham or undercooked ham in this method, as the boiling process won't fully cook it. Always check the package label for "fully cooked" status.
What if my ham browns too quickly during the initial cooking?
This happens when the oven runs hotter than expected. If the ham starts browning prematurely, tent it loosely with aluminum foil and continue cooking. The goal is to reach 140°F internally—don't rush it. For even better control, use an oven thermometer to verify your oven's actual temperature. The glaze step later will add color and shine, so don't worry about perfect browning at this stage.
How do I adjust the glaze for a smaller ham?
For every 4 pounds of ham, use half the glaze recipe. The 8-pound version makes about 1.5 cups of glaze—scale down proportionally. For a 4-pound ham, use 0.5 cup brown sugar, 0.25 cup mustard, 0.125 cup honey, and 0.5 tbsp orange zest. Keep the same ratio of ingredients to maintain balance. The smaller surface area will caramelize faster, so watch closely during the final 15-20 minutes.
Can I make this ham ahead of time?
This ham actually tastes better the next day when flavors meld. Cook it completely through to 140°F, glaze it, and let it cool. Store it wrapped in the refrigerator for up to 3 days. Reheat covered at 325°F for 20 minutes before serving. For longer storage, freeze the glazed ham (without resting) for up to 3 months. Thaw overnight in the fridge before reheating.