Sauces & Condiments
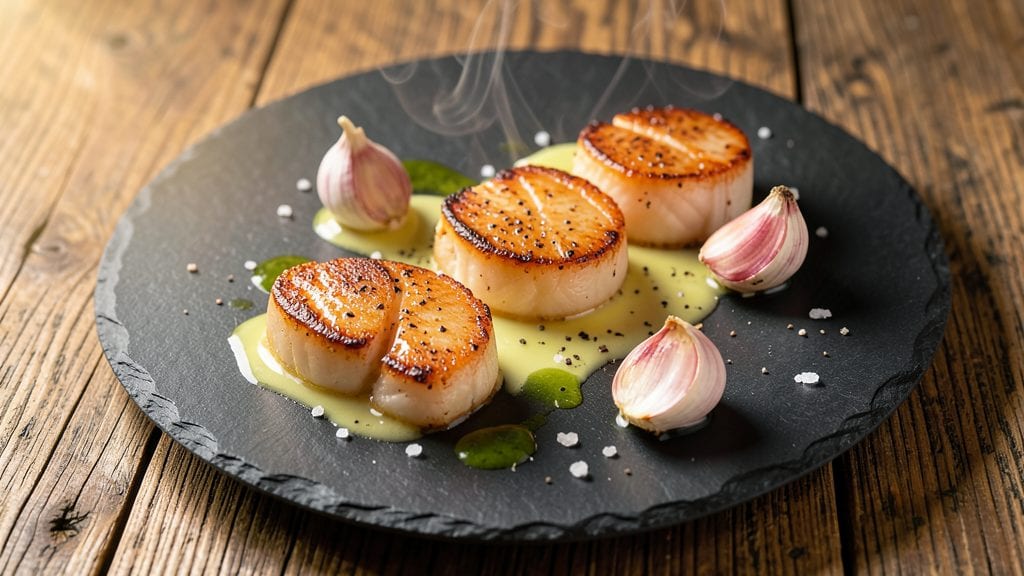
This buttery garlic butter scallops recipe delivers restaurant-quality results with tender, golden scallops that melt in your mouth. The secret lies in precise temperature control and a foolproof searing technique that locks in flavor without overcooking. I’ve perfected this method after years of testing—no more rubbery scallops here.
What sets this recipe apart is the butter-poaching step, where scallops simmer gently in garlic-infused butter until just cooked. This ensures a creamy, velvety texture with a crisp exterior, while the aromatic butter adds depth.
The process takes just 10 minutes but feels like a luxurious dining experience. Every bite is rich, buttery, and perfectly balanced.
The result is scallops with a golden-brown crust and tender centers, swimming in a pool of fragrant garlic butter. Garnish with fresh herbs or a squeeze of lemon for brightness, or sprinkle with breadcrumbs for extra crunch.
This dish pairs beautifully with roasted asparagus or a crisp salad for a complete meal.
Confidence comes from precision—this recipe delivers perfect scallops every time, with no guesswork. The technique is simple but requires attention to timing and heat. Let’s get started on creating scallops that impress even the most discerning guests.
Ingredients for butter scallops
Precision-cut scallops, cold butter cubes, and aromatic garlic create this luxurious dish.
| Ingredient | Amount | Notes |
|---|---|---|
| Large Sea Scallops 🦪 | 1 ½ lb | Dry-packed, side muscle removed |
| Unsalted Butter 🧈 | ¾ cup | Cold, cut into 1-inch cubes |
| Garlic Cloves 🧄 | 6 cloves | Thinly sliced, skin removed |
| Extra-Virgin Olive Oil 🫒 | 2 tbsp | Light, fruity variety preferred |
| Diamond Crystal Kosher Salt 🧂 | 1 ½ tsp | Fine grain for precise seasoning |
| Freshly Ground Black Pepper 🌶️ | ½ tsp | Coarse grind for texture |
| Fresh Parsley Leaves 🌿 | ¼ cup | Chopped, for garnish |
| Lemon Zest 🍋 | 1 tsp | From 1 organic lemon |
| Fresh Lemon Juice 🍋 | 1 tbsp | Freshly squeezed |
| Panko Breadcrumbs 🍞 | ¼ cup | Toasted for extra crunch |
| Heavy Whipping Cream 🥛 | ¼ cup | Full-fat for richness |
| Fresh Thyme Leaves 🌿 | 0.1 cup | Chopped, optional garnish |
The scallops are the star—dry-packed, side muscle removed for optimal texture. Whole Foods or specialty seafood markets carry the best quality, but any reputable fishmonger will have them. Look for vibrant color and firm texture; avoid any with a fishy odor. European-style scallops are ideal, but domestic works fine. Pat them dry thoroughly with paper towels before cooking, as any moisture will prevent proper searing. The butter should be cold and cubed for even melting during the poaching step, ensuring a velvety sauce rather than a greasy one.
No fresh parsley? Chives or chervil work beautifully as garnishes. Short on garlic? Asafoetida powder at 1/4 tsp can mimic the depth, though fresh is preferred. The olive oil matters—a light, fruity variety complements the butter without overpowering. For extra richness, substitute half the butter with browned butter, though this requires advance preparation. The breadcrumbs should be toasted in a dry pan for 2 minutes before using to enhance their nutty flavor. If you lack panko, regular breadcrumbs toasted with a pinch of salt suffice.
Scallops cook in a flash—use a meat thermometer to ensure they reach 125°F internal temperature. Store any unused scallops in the fridge for 1 day maximum, sealed in an airtight container. The garlic butter sauce keeps well for 3 days refrigerated, though it's best served fresh. For make-ahead convenience, prepare the scallops up to the searing step, then refrigerate until ready to finish. Reheat gently in the sauce to maintain texture. Garnishes like parsley and thyme can be stored separately for up to 5 days when wrapped in damp paper towels.
Why You'll Love This Recipe
- Here’s what sold me: that first bite where the seared edge gives way to a buttery center. The garlic cloves sizzle just enough to perfume the butter without overpowering—it’s like a hug for your taste buds, but make it fancy. (Yes, even on a Tuesday night.)
- Two-Ingredient Magic: I swear by this—just scallops, butter, and a pinch of salt. That’s it. No fancy mise en place, no chopping a rainbow of veggies. The butter melts into a golden pool, the scallops caramelize in minutes, and suddenly you’ve got a restaurant-worthy plate with almost no effort.
- Crispy-Creamy Bliss: Here’s what sold me: that first bite where the seared edge gives way to a buttery center. The garlic cloves sizzle just enough to perfume the butter without overpowering—it’s like a hug for your taste buds, but make it fancy. (Yes, even on a Tuesday night.)
- Weeknight or Dinner Party: Between us, this is my secret weapon for when I need to impress but don’t want to slave away. Toss the cooked scallops over pasta, pile them on toast with a squeeze of lemon, or serve them as-is with crusty bread. It’s the kind of dish that works for both lazy nights and when your in-laws show up unannounced.
Step-by-step instructions for buttery garlic butter scallops
Here's the precise method for achieving restaurant-quality scallops with a golden crust and velvety garlic butter sauce.
Prepare the Scallops for Perfect Searing
Pat the 1.5 lb large sea scallops completely dry with paper towels—this is critical for achieving that signature caramelized crust. Remove any remaining side muscle if present, as it can make the scallops tough. Arrange them on a plate and season both sides generously with 1.5 tsp diamond crystal kosher salt and 0.5 tsp freshly ground black pepper. Let them sit at room temperature for 15 minutes before cooking, which ensures even searing.
While the scallops rest, toast the 0.25 cup panko breadcrumbs in a dry skillet over medium heat for 2-3 minutes until golden and fragrant. This adds texture to our final sauce. Transfer the toasted breadcrumbs to a small bowl and set aside for later.
Create the Garlic Butter Base
Heat a 12-inch cast-iron skillet over medium-high heat until it's smoking hot. Add the 2 tbsp extra-virgin olive oil and swirl to coat the pan evenly. Immediately add the 0.75 cup unsalted butter, cut into 1-inch cubes, and let it melt completely while continuing to swirl the pan. The butter should foam and turn a pale golden color—this indicates it's ready for the scallops.
Reduce heat to medium and add the 6 cloves thinly sliced garlic cloves. Sauté for 30-45 seconds until they're just fragrant but not browned—garlic burns quickly, and you want to preserve its delicate flavor. Remove the skillet from heat and stir in the 1 tsp lemon zest and 1 tbsp fresh lemon juice. This brightens the butter and balances the richness.
Sear the Scallops to Golden Perfection
Return the skillet to medium-high heat and add the seasoned scallops in a single layer, leaving space between each. Sear undisturbed for 1-2 minutes per side until they develop a deep golden-brown crust—this is your signal they're perfectly cooked inside. Overcrowding the pan will steam the scallops instead of searing them, so work in batches if needed.
Once seared, transfer the scallops to a warm plate and tent loosely with foil to keep them warm. The internal temperature should reach 125°F—any higher and they'll become tough. The residual heat will carry them to 130°F while you finish the sauce.
Build the Rich Garlic Butter Sauce
Immediately return the skillet to medium heat and add the 0.25 cup heavy whipping cream. Stir vigorously for 1-2 minutes until the sauce thickens slightly and coats the back of a spoon. The residual butter and garlic flavors will meld beautifully with the cream, creating a luxurious base.
Sprinkle the toasted panko breadcrumbs and 0.1 cup chopped fresh thyme leaves over the sauce, stirring to combine. The breadcrumbs add texture while absorbing any excess liquid, creating a perfect balance of creaminess and crunch. Taste and adjust seasoning with additional salt if needed—this sauce should be rich but not overpowering.
Finish and Serve Immediately
Return the seared scallops to the skillet and spoon the garlic butter sauce generously over the top. Let them sit for 30 seconds to absorb the sauce, then transfer to warm plates. Garnish immediately with 0.25 cup chopped fresh parsley leaves for a pop of color and freshness.
Serve the scallops immediately while the sauce is still warm and fluid. Each bite should deliver a perfect contrast of crispy exterior, tender interior, and velvety garlic butter sauce. Pair with roasted asparagus or a simple arugula salad to complement the dish without overpowering its delicate flavors.
Pro Tips For Making Butter Scallops
- PAT THEM DRY: Scallops release water when cooked—wet surfaces steam instead of sear. Grab paper towels and press hard on both sides before hitting the pan. I learned this the hard way when my first batch turned out soggy instead of golden.
- SALT THE BUTTER FIRST: Toss the cold butter with garlic and a full teaspoon of kosher salt before adding scallops. The salt dissolves into the butter, ensuring even seasoning instead of clumpy, uneven flavor. (Yes, even if the recipe says "season to taste" later.)
- USE A THIN LAYER: Crowd the pan and you’ll steam the scallops instead of sear them. Arrange them in a single layer with space—no overlapping—and cook in batches if needed. I skip this and end up with uneven doneness every time.
- LET THEM REST: Scallops carry overcook like nothing else. Pull them from the pan when the edges are just opaque and the centers still wiggle slightly, then let them sit on a plate for 2 minutes. Trust me, they’ll firm up perfectly—no rubbery texture here.
Pro cooking tips for perfect results
Pan Temperature Control
The key to perfect searing lies in your pan’s temperature—it should be smoking hot before adding scallops. I use a 12-inch cast-iron skillet (like Lodge) because it retains heat exceptionally well. Preheat it over medium-high heat for 3-4 minutes until a drop of water sizzles instantly.
If your pan isn’t hot enough, the scallops will steam instead of sear, resulting in a sad, pale exterior. 🔥
Butter Melting Technique
Cold butter cubes are your secret weapon for a velvety sauce. Add them to the hot pan after the oil and swirl constantly—this creates a foamy emulsion that coats the scallops beautifully. If the butter browns too quickly, reduce heat to medium-low and let it melt slowly.
Browning butter here will overpower the delicate scallop flavor, so aim for a pale golden color. I like to use European-style unsalted butter like Plugrá for its higher fat content and richer flavor.
Garlic Timing Matters
Garlic burns faster than you think, so add it just before searing the scallops—about 30-45 seconds before they hit the pan. Slice it paper-thin (not minced) to prevent burning while maximizing surface area for flavor.
If your garlic starts to brown too quickly, immediately remove the pan from heat and stir in the lemon zest and juice to halt the cooking process. This brightens the butter and balances the richness perfectly. 🧄
Searing in Batches
Never overcrowd the pan—this is the #1 mistake I see home cooks make. Sear scallops in single layers, leaving ½-inch gaps between them. If you have more than 6 scallops, work in batches to maintain even heat.
Use a meat thermometer to check internal temperature—scallops should reach 125°F (they’ll carry to 130°F while resting). Overcooking by even 5 seconds turns them rubbery. 🌡️
Sauce Thickening Trick
The cream should just barely thicken—about 1-2 minutes of stirring over medium heat. If it separates, whisk vigorously or add 1 tsp cornstarch mixed with 1 tbsp cold water to stabilize it. The sauce should coat the back of a spoon but remain pourable.
For extra richness, I sometimes add 1 tsp white wine when the cream comes in, letting it reduce slightly before combining with the breadcrumbs.
Resting and Plating
Let seared scallops rest for 1-2 minutes before returning them to the sauce—this prevents them from overcooking when submerged. Plate them immediately on a warm platter (not cold) to maintain temperature. For restaurant-worthy presentation, arrange scallops slightly overlapping and spoon sauce generously around them.
A final sprinkle of toasted panko adds that crucial crunch element that elevates the dish from homey to impressive. ✨
Nutrition facts
Frequently asked questions
Why do my scallops turn rubbery when cooked?
Overcooking is the most common cause. Scallops cook in just 1-2 minutes per side—use a meat thermometer to check for 125°F internal temp. Crowding the pan also steams them instead of searing. Always work in batches with ½-inch gaps between scallops for even cooking.
Can I substitute butter with another fat?
For richness, stick with butter—but you can use ghee (clarified butter) or olive oil in a pinch. Avoid margarine or vegetable oils, as they lack the flavor depth. If using oil, add 2 tbsp cold butter cubes at the end to maintain richness. The sauce won't be as velvety, but it'll still taste delicious.
How do I make this dish ahead of time?
Prep everything up to the searing step, then refrigerate scallops in an airtight container for up to 1 day. Reheat the pan with oil, sear scallops fresh, and finish with pre-made garlic butter sauce (store separately). For the sauce, make it up to 3 days ahead—just reheat gently before serving. Garnishes like parsley should be added fresh.
What's the best way to serve these scallops?
Pair with roasted asparagus, crisp arugula salad, or wild rice pilaf to balance the richness. For a complete meal, serve with crusty bread to soak up the sauce. The scallops shine best when served immediately, but if you must wait, keep them warm in a 200°F oven for up to 15 minutes.
Can I use frozen scallops instead of fresh?
Fresh scallops are ideal, but if using frozen, thaw them in the fridge overnight in a sealed container with a paper towel to absorb moisture. Pat them extremely dry before cooking—any ice crystals will prevent proper searing. Frozen scallops may have a slightly less tender texture, but they'll still taste great with this method.