
Side Dishes
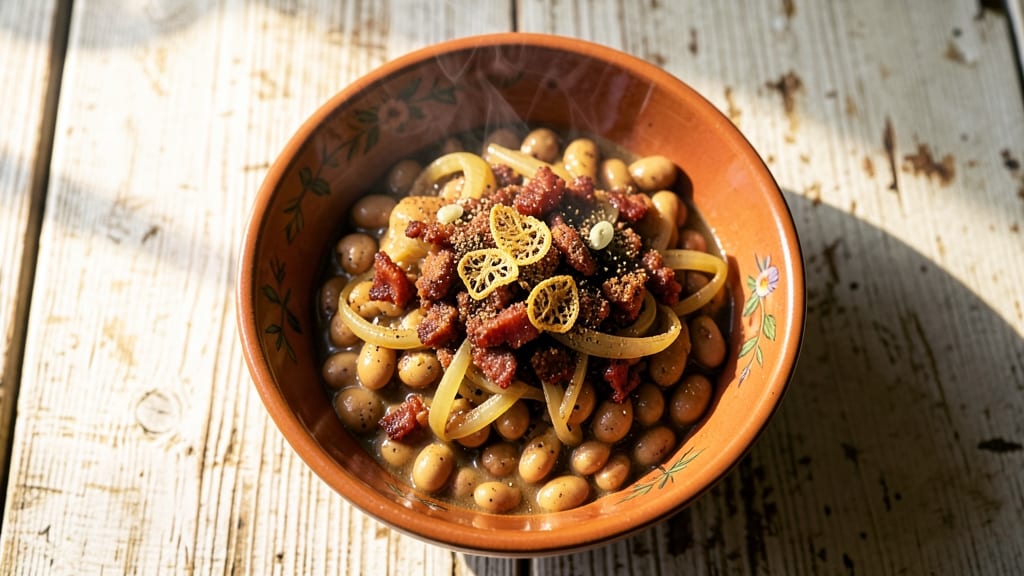
Grandma's old-fashioned pinto beans recipe is the kind that transforms a simple side dish into a centerpiece of warmth and tradition. I grew up eating these beans every Sunday, simmered low and slow until they reached that perfect tender-spiced richness.
The secret lies in the patience—letting them soak overnight and cook for hours until the flavors meld into something deeply comforting. This isn't just a recipe; it's a taste of home, passed down through generations with every spoonful.
The process begins with soaking the beans to soften them, then simmering them with just the right blend of spices—smoky paprika, earthy cumin, and a touch of garlic—that build flavor as they cook. No shortcuts here; this is about time-honored techniques that create that signature texture and depth.
The result is beans that are tender yet hold their shape, with a broth so flavorful you'll want to drink it too. It’s the kind of dish that gets better with each bite and each passing hour.
By the time you’re done, you’ll have a pot of beans so rich and aromatic they’ll make your kitchen smell like Sunday dinner.
The slow simmering develops a depth of flavor you can’t replicate with quick methods, and the spices infuse the beans until every mouthful tastes like a hug from family.
Serve them with cornbread to soak up that delicious broth, or pair them with grilled meats for a meal that feels like a celebration. This is the kind of recipe that brings people together—one spoonful at a time.
What makes this recipe special is how it balances simplicity with tradition. You don’t need fancy ingredients or complicated techniques—just time, patience, and a few key spices. The beauty of old-fashioned cooking lies in its reliability; this recipe has been perfected over years, and it never fails to deliver.
Whether you're feeding a crowd or just treating yourself, these beans will become a staple in your kitchen, just like they were in mine.
Ingredients for grandma's old fashioned pinto beans
Six simple ingredients transform into a pot of beans so rich and aromatic they'll make your kitchen smell like Sunday dinner.
| Ingredient | Amount | Notes |
|---|---|---|
| Dried Pinto Beans 🌾 | 2 cups | Rinsed before soaking overnight |
| Bacon 🥓 | 8 oz | Thick-cut, chopped for smoky flavor |
| Yellow Onion 🧅 | 1 whole | Chopped into small dice |
| Garlic Cloves 🧄 | 4 cloves | Minced for aromatic depth |
| Smoked Paprika 🌶️ | 2 tbsp | Key for authentic smoky flavor |
| Ground Cumin 🌿 | 1 tbsp | Toasted for earthy warmth |
| Salt 🧂 | 1 ½ tsp | Kosher or sea salt preferred |
| Black Pepper 🌶️ | ½ tsp | Freshly ground for best flavor |
| Bay Leaves 🍃 | 2 whole | Fresh for subtle herbal notes |
| Chicken Broth 💧 | 4 cups | Low-sodium for flavor control |
| Olive Oil 🫒 | 2 tbsp | For initial cooking of bacon |
| Apple Cider Vinegar 🍎 | 1 tbsp | Brightens the final flavor |
The beans are the heart of this recipe, so pick the best quality you can find. I always grab my pinto beans from Whole Foods or the bulk section at Trader Joe's—they stay fresher longer. The bacon? Thick-cut, center-cut makes all the difference—it renders slowly and adds that deep, smoky flavor. If you're short on time, don't skip the overnight soak. I know it's tempting to use canned beans, but nothing compares to the texture and flavor of properly soaked dried beans. The onion and garlic? Yellow onions have the right sweetness, and garlic cloves should be plump and firm when you smash them.
No smoked paprika? Substitute with a mix of regular paprika and a dash of liquid smoke—just be careful not to overdo it. Running out of cumin? Ground coriander at the same amount works in a pinch, though it'll have a slightly different profile. Fresh bay leaves are ideal, but dried will work too at half the amount. The vinegar adds brightness—if you don't have apple cider, white vinegar or lemon juice both work. For the broth, homemade is best, but a quality low-sodium store-bought brand like Swanson or Pacific Foods will do in a hurry. And if you're wondering about the bacon—turkey bacon or vegetarian bacon can work, but trust me, the real thing makes these beans sing.
These beans taste even better the next day—the flavors meld and deepen with time. Store them in an airtight container in the fridge for up to 5 days, or freeze for up to 6 months if you're planning ahead. I always make a double batch because they disappear fast—leftovers make perfect lunches or a quick soup base. The broth freezes well too, so you can save it for future batches. And if you've got cornbread on hand, serve it alongside for the ultimate comfort food combo. This recipe is all about patience and letting the flavors develop, so don't rush it.
Why You'll Love This Recipe
- Soak-and-Go Magic: I swear by the overnight soak—just toss in dried pinto beans with water, a pinch of salt, and let them plump up while I sleep. No fancy gadgets, no fuss, and honestly? The flavor rewards the patience.
- Smoky Bacon Hug: That crispy bacon isn’t just for looks—it fries up until it’s nearly black, then gets crushed into the beans for a salty, smoky punch. The onions caramelize right in the same pot, and the garlic? Oh, it melts into something deeper than just flavor.
- Leftovers That Beg for More: This recipe doubles easily, and the next day? Even better. The beans soften just right, the bacon stays crispy in spots, and I’ve caught myself reheating it three times because it’s that good. (Yes, even on a Tuesday night.)
- Budget-Friendly Crowd Pleaser: Dried beans and bacon stretch this into a meal that feeds six for under $10. Serve it with cornbread or rice, and suddenly you’ve got a full spread that tastes like a Sunday dinner—without the stress or the grocery bill.
Step-by-step instructions for Grandma's old-fashioned pinto beans
Here's how to make these rich, smoky beans that taste just like Grandma's—slow-simmered to perfection.
Soak and Prepare the Dried Pinto Beans
Place the 2 cups dried pinto beans in a large bowl and cover them with plenty of cold water—at least 8 cups. Let them soak overnight (or for at least 8 hours) on your countertop. This step is crucial because it reduces cooking time and prevents the beans from staying hard. After soaking, drain the beans and rinse them thoroughly under cold water to remove any excess starch.
I like to soak them in a colander in the sink overnight—it's less messy than a bowl. The beans will nearly double in size by morning. If you forget to soak them overnight, you can soak them for at least 4 hours or use the quick-soak method: boil the beans for 2 minutes, then let them sit off heat for 1 hour before cooking.
Cook the Bacon and Build the Flavor Base
In a large Dutch oven or heavy pot, heat the 2 tablespoons olive oil over medium heat. Add the chopped 8 oz bacon and cook it slowly until it's crispy and the fat has rendered out—this usually takes about 8-10 minutes. Don't rush this step; crispy bacon adds the perfect smoky depth to the beans.
Once the bacon is done, use a slotted spoon to remove it from the pot and set it aside on a paper towel-lined plate, leaving the rendered fat in the pot. Add the chopped 1 whole yellow onion to the pot and cook it for 5-6 minutes, stirring occasionally, until it softens and becomes translucent. This creates the flavor foundation for your beans.
Add Aromatics and Spices for Depth
Push the onion to one side of the pot and add the minced 4 cloves garlic cloves. Cook them for 30 seconds until fragrant—you'll know they're ready when the kitchen smells amazing. Stir them into the onion, then sprinkle in the 2 tablespoons smoked paprika and 1 tablespoon ground cumin. Cook these spices for 1 minute, stirring constantly, until they're aromatic and the paprika deepens in color.
This is where the magic happens—the smoked paprika gives those classic smoky notes, while the cumin adds earthy warmth. Don't skip this step; these spices are the soul of Grandma's beans. Add the 1.5 teaspoons salt and 0.5 teaspoon black pepper, stirring to combine everything thoroughly.
Simmer the Beans Slowly for Maximum Flavor
Add the drained 2 cups soaked pinto beans to the pot along with the 4 cups chicken broth. Stir everything together, then bring the mixture to a gentle boil over medium-high heat. Once boiling, reduce the heat to low, cover the pot with a lid, and let the beans simmer for 1.5 to 2 hours. You want them to cook slowly and gently—this is what makes them tender and flavorful.
Here's the thing—don't peek or stir too often. Every time you lift the lid, steam escapes and the beans take longer to cook. Instead, check them occasionally by spooning a bean out to taste. They're done when they're tender but still hold their shape. Add the 2 whole bay leaves about 30 minutes before the beans are done to infuse subtle herbal notes.
Finish with Bacon and Vinegar for Brightness
When the beans are tender, remove the bay leaves. Stir in the crispy bacon you set aside earlier and the 1 tablespoon apple cider vinegar. The vinegar brightens the flavors and cuts through the richness of the bacon and beans. Let the mixture simmer uncovered for another 5 minutes to let the flavors meld together.
Taste and adjust the seasoning if needed—you might want to add a bit more salt or vinegar to balance the flavors. The beans should be rich, smoky, and perfectly seasoned. Serve them warm with cornbread or over rice, and you'll have that classic, comforting taste of Grandma's kitchen.
Pro Tips For Making Grandma'S Old Fashioned Pinto Beans
- SOAK BEANS OVERNIGHT: Dried pinto beans need at least 8 hours in water to soften properly—don’t rush it. I used to skimp on soaking time, and my beans always turned out mealy, no matter how long I simmered them.
- CRISP THE BACON LOW: Cook the bacon slow and steady at 300°F (150°C) instead of blistering it on high. You’ll get more render-out fat for flavor, and the edges stay crisp without burning—just like Grandma’s, where the bacon stays crisp even after hours of simmering.
- SKIP THE BOILING: Once the beans hit the pot, keep the heat at a gentle simmer—not a rolling boil. Boiling toughens beans and makes them split open, turning your creamy beans into a mushy mess. A steady, low bubble is all you need.
- SWEAT THE ONIONS FIRST: Chop the onion and garlic fine, then cook them in the bacon fat until soft and translucent before adding the beans. This builds flavor layer by layer—no one wants to taste raw onion in their beans, and this step guarantees a rich, deep taste.
Essential equipment for grandma's old fashioned pinto beans
Dutch Oven
This is my non-negotiable piece of equipment for these beans. A 6-quart Dutch oven like the Lodge Pre-Seasoned Dutch Oven handles the slow simmer beautifully while distributing heat evenly. I’ve tried other pots, but nothing matches the even cooking and flavor development of a Dutch oven.
The heavy cast iron retains heat perfectly, which is crucial for that long, slow cook. 🔥
Slow Cooker
For those busy days when you can’t babysit the stove, a 6-quart slow cooker is your best friend. I use my Hamilton Beach Programmable Slow Cooker on the low setting for 8-10 hours.
The beauty of this method is that you can prep everything in the morning and come home to perfectly cooked beans. Just add the soaked beans, broth, and pre-cooked bacon to the slow cooker after sautéing the aromatics in a separate pan.
Immersion Blender
If you want that creamy texture without overcooking the beans, an immersion blender is a game-changer. After simmering, I blend about half the beans directly in the pot for 10-15 seconds to create a thick, velvety broth while keeping the rest intact.
My go-to is the Ninja Foodi Immersion Blender—it’s powerful enough to handle the job without making a mess. Just be careful not to over-blend, or you’ll end up with mushy beans.
Measuring Cups
Precision matters when it comes to spices and liquids. I always use stainless steel measuring cups like the OXO Good Grips set for accuracy. For the smoked paprika and cumin, I measure directly into the pot using a small spoon to avoid spills.
Trust me, the difference between 1 tablespoon and 1.5 tablespoons of salt can make or break the flavor balance. A set of dry measuring spoons with a magnetic lid keeps everything organized on the counter.
Colander
Don’t skip the soaking step, and for that, you’ll need a large colander. I use a stainless steel colander with a wide rim to fit comfortably in my sink.
After soaking, I rinse the beans thoroughly under cold water to remove excess starch, which helps prevent the beans from turning gummy during cooking. A colander with holes large enough for beans (not too fine) ensures quick draining. Pro tip: Place it in the sink overnight to avoid spills.
Tongs
For handling the crispy bacon and stirring the pot without burning yourself, a pair of heat-resistant tongs is essential. I grab the OXO Good Grips Tongs—they’re long enough to keep my hands safe and sturdy enough to handle the bacon and beans.
Use them to lift the bacon out of the pot after cooking, leaving the delicious rendered fat behind for flavor. They’re also great for stirring the pot gently without breaking the beans. 💪
Nutrition facts
Frequently asked questions
Why do I need to soak the beans overnight?
Soaking overnight softens the beans and reduces cooking time by 30-50%. This prevents them from staying hard or splitting during cooking. The overnight soak also helps remove impurities, resulting in a cleaner-tasting dish. If you're short on time, a 4-hour soak or quick-soak method works too.
Can I use canned beans instead of dried?
While it's possible, canned beans won't give you the same rich, homemade flavor. If you must use them, drain and rinse thoroughly, then simmer in the broth for 30-45 minutes to absorb the flavors. For best results, stick with dried beans—they develop that deep, smoky richness when cooked slowly.
How do I know when the beans are fully cooked?
They're done when they're tender but still hold their shape. Test by spooning a bean out and tasting—it should be soft with a slight resistance. The beans should also be fully submerged in the broth. If they're still firm after 2 hours, add 1 more cup of broth and cook another 30 minutes.
What if my beans turn out too thick or too thin?
If they're too thick, stir in ½ cup of broth at a time until reaching your desired consistency. For too-thin beans, simmer uncovered for 10-15 minutes to reduce the liquid. The ideal texture should be creamy but still have some broth to spoon over rice or cornbread.
Can I make this recipe in a slow cooker?
Sauté the bacon, onions, and spices as directed, then transfer everything to a 6-quart slow cooker. Add the soaked beans and broth, then cook on low for 8-10 hours. Stir in the bacon and vinegar at the end. This hands-off method gives you the same rich flavors with minimal effort.