
Main Courses
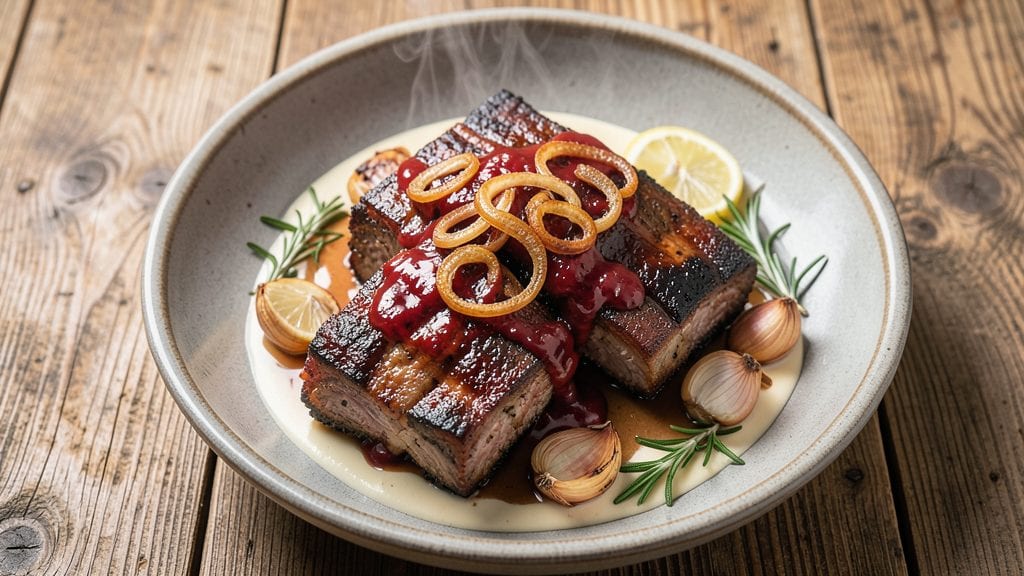
Mastering oven-baked beef ribs that are fall-off-the-bone crispy without a smoker is simpler than you think—this method delivers restaurant-quality results in just 3 hours.
I perfected this technique after years of testing, and the secret lies in precise seasoning, controlled oven temperatures, and a strategic wrap that locks in moisture while creating that coveted bark. The ribs develop deep, smoky-sweet flavors while staying tender inside, proving you don’t need a smoker for showstopping results.
What sets this recipe apart is the two-phase baking process: starting with a high-heat sear to develop flavor, then wrapping the ribs in foil with a flavorful liquid to steam them gently. This approach ensures the meat stays moist while the edges crisp beautifully.
The final hour of uncovered baking transforms the surface into a caramelized, crackling crust that’s impossible to resist. Every bite delivers that perfect balance of tender meat and crispy exterior.
By the time you’re done, you’ll have ribs so tender they practically melt when you touch them, with edges that are crispy enough to stand up to a toothpick.
The aroma alone will have everyone gathering around the table, and the flavor—rich, smoky, and slightly sweet—will make this your new go-to recipe. This method works equally well for beef short ribs or beef back ribs, making it versatile for any occasion.
The best part? No babysitting required—just set your oven and let it work its magic. Whether you're feeding a crowd for a weekend barbecue or treating yourself to a special meal, these ribs will impress without the hassle.
Let’s get started on creating ribs that will have everyone asking for seconds.
Ingredients for oven baked beef ribs
Four pounds of meat, a handful of pantry staples, and oven magic. No smoker needed.
| Ingredient | Amount | Notes |
|---|---|---|
| Beef Short Ribs 🥩 | 4 lb | Bone-in, cut into individual ribs |
| Yellow Onion 🧅 | 1 whole | Large, sliced into wedges |
| Garlic Cloves 🧄 | 8 cloves | Peeled, smashed for flavor |
| Dry Mustard 🌶️ | 2 tbsp | For tangy depth |
| Worcestershire Sauce 💧 | 2 tbsp | Full-strength for umami |
| Beef Broth 🍲 | 2 cups | Low-sodium preferred |
| Apple Cider Vinegar 🍎 | ½ cup | For tenderizing |
| Brown Sugar 🍚 | ½ cup | Light or dark variety |
| Smoked Paprika 🌶️ | 2 tbsp | For smoky flavor |
| Kosher Salt 🧂 | 2 tbsp | Coarse grain preferred |
| Black Peppercorns 🌶️ | 1 tbsp | Freshly cracked |
| Aluminum Foil 📄 | 1 sheet | Heavy-duty for wrapping |
| Butter 🧈 | ½ cup | Unsalted, cubed |
The ribs are the star—bone-in beef short ribs give you that rich flavor and texture. Look for marbled cuts at your butcher or grocery store's meat department (the Costco or Whole Foods sections usually have great options). If you can't find short ribs, beef back ribs work too, but they'll need an extra 30 minutes in the oven. Pat them dry before seasoning—this helps the crust form better. I always buy extra ribs when they're on sale and freeze half for later; they reheat beautifully.
No smoked paprika? Substitute 1 tbsp regular paprika plus 1 tsp liquid smoke for that smoky depth. Out of apple cider vinegar? Balsamic vinegar or lemon juice works in a pinch. The beef broth can be swapped for water plus 1 bouillon cube, but you'll lose some depth. For extra tenderness, add 1 tbsp of baking soda to the broth (it breaks down proteins). The mustard adds tang—Dijon works too—just don't skip it. And if you're feeling fancy, brandy or bourbon (2 tbsp) in the broth adds a nice complexity.
These ribs reheat like a dream—wrap them in foil and bake at 300°F for 20-30 minutes until warmed through. Store leftovers in the fridge for up to 4 days or freeze for 3 months (portion into individual ribs for easy reheating). The foil-wrapped ribs keep well in the fridge for 2 days before baking. For a shortcut, prep the ribs and sauce the night before—just bake when ready. The final crispy stage can't be rushed, so plan ahead if you're serving a crowd.
Why You'll Love This Recipe
- Few-Pan Setup: I swear by this recipe because it’s all about the easy win—just ribs, onions, and garlic tossed on one sheet pan. No fancy equipment, no last-minute grocery runs for obscure spices. The mustard and Worcestershire do the heavy lifting while you sip wine and watch the oven do the work.
- Rich Without Effort: Between us, that dry mustard and Worcestershire combo turns tough short ribs into something dangerously tender and deeply savory. The onions caramelize right on the pan, adding a sweet, jammy depth that makes every bite feel like a hug. (Yes, even on a Tuesday night.)
- Leftovers That Shine: Honestly, I make this on Sunday and eat it all week—it reheats like a dream. Shred the ribs for tacos, sandwiches, or even a hearty pasta. The flavors only get better as they sit, so you’re not stuck with dry, sad leftovers.
- Budget-Friendly Luxury: Short ribs aren’t cheap, but this recipe stretches them further than you’d think. A single batch feeds four with room for seconds, and the ingredients are basic enough that you’re not breaking the bank. Fancy dinner without the fancy price tag? That’s the move.
Step-by-step instructions for oven baked beef ribs
Here's how to transform tough beef short ribs into melt-in-your-mouth perfection with crispy edges - all in your home oven.
Prepare the Ribs for Maximum Flavor
Start by trimming any excess fat from the beef short ribs, leaving about ¼ inch of fat cap for moisture during cooking. Pat the ribs dry with paper towels - this step is crucial for achieving that crispy bark we're after. In a small bowl, combine the 2 tablespoons dry mustard, 2 tablespoons Worcestershire sauce, 2 tablespoons smoked paprika, 2 tablespoons kosher salt, and 1 tablespoon freshly cracked black peppercorns. Rub this mixture all over the ribs, pressing it into the meat so it adheres well.
Place the seasoned ribs in a large roasting pan, fat-side up. This positioning allows the fat to render and baste the meat as it cooks. Cover the pan tightly with aluminum foil and refrigerate for at least 4 hours or overnight. This dry-brining process enhances flavor penetration and helps create that coveted crispy exterior.
Build the Flavorful Braising Liquid
While the ribs are brining, prepare the cooking liquid. In a medium saucepan, combine the 2 cups beef broth, ½ cup apple cider vinegar, and ½ cup brown sugar. Bring to a boil over medium-high heat, then reduce to a simmer and cook for 5 minutes to allow the flavors to meld. This liquid will become the flavorful base for our ribs.
Add the sliced yellow onion and 8 smashed garlic cloves to the simmering liquid. Let it cook for an additional 5 minutes until the onions are tender and the garlic is fragrant. Remove from heat and let cool slightly. This aromatic mixture will infuse the ribs with incredible depth of flavor during the braising process.
Sear the Ribs for Crispy Texture
Preheat your oven to 300°F. Remove the ribs from the refrigerator and let them sit at room temperature for 30 minutes. Heat a large oven-safe skillet over medium-high heat. Add the ½ cup cubed butter and let it melt completely, then add the ribs to the skillet. Sear the ribs for 3-4 minutes per side until they develop a deep golden brown color - this is where that crispy texture begins to form.
Transfer the seared ribs to the roasting pan. Pour the prepared braising liquid over the ribs, making sure they're completely submerged. The liquid should come about halfway up the ribs. Cover the pan tightly with aluminum foil and place it in the preheated oven.
Braise Until Fall-Off-The-Bone Tender
Braise the ribs for 3 hours. After the initial 3 hours, check the internal temperature using a meat thermometer. The ribs should reach 195-200°F at their thickest point. If they haven't reached this temperature yet, continue cooking for another 30-60 minute increments, covered, until they do.
Here's the thing - the ribs will continue cooking as they rest, so don't worry if they're not quite there at 3 hours. The key is that fork-tender texture. When they're done, remove the ribs from the oven and let them rest in the braising liquid for 15 minutes. This resting period allows the juices to redistribute throughout the meat.
Achieve the Perfect Crispy Finish
Remove the ribs from the braising liquid and place them on a baking sheet lined with aluminum foil. Increase your oven temperature to 425°F. Broil the ribs for 5-7 minutes until they develop a beautiful crispy bark. Watch them closely during this time - you want that deep golden brown color, but be careful not to burn them.
Once crispy, transfer the ribs to a serving platter. Spoon the braising liquid through a fine-mesh strainer into a saucepan and simmer over medium heat until slightly thickened. Serve the ribs hot with the reduced braising sauce spooned over the top. Each bite should deliver that perfect combination of tender meat and crispy exterior - exactly what we promised!
Pro Tips For Making Oven Baked Beef Ribs
- Brown the Ribs First: Skip the raw look—sear those beef short ribs in a hot oven-safe pan with oil until deep brown before transferring. I learned this the hard way: ribs baked straight from fridge never get that rich, caramelized crust that clings to every bite. Five minutes at 450°F does the trick.
- Dice Onions Like Dice: Cut your yellow onions into ¼-inch cubes, not slices. The smaller surface area keeps them tender instead of turning to mush—especially important since they’re baking alongside ribs for hours. I used to overlook this, and my sauce ended up watery.
- Don’t Rush the Low Heat: After the initial sear, drop the oven to 275°F and bake covered for 2.5–3 hours. I know, it’s tempting to crank it up, but low and slow breaks down the collagen into silky goodness. Trust the thermometer—aim for 203°F internal temp.
- Mix Mustard Early: Whisk dry mustard into your Worcestershire sauce before adding it to the ribs. I used to sprinkle it on top, and it just sat there like a sad yellow powder. Stirring it in ensures even flavor distribution—no bitter surprises.
Flavor customization for this recipe
Smoky-Sweet Variations
For a deeper smoky flavor, swap the smoked paprika for 1 tbsp chipotle powder (adobo-style) blended with 1 tbsp brown sugar. This adds a subtle heat that pairs perfectly with the ribs' richness. I like to add ½ tsp cayenne pepper to the braising liquid for an extra kick.
For a sweeter profile, replace ½ cup brown sugar with ½ cup honey—it caramelizes beautifully during the final crisping stage. 🌶️
Spicy Heat Options
If you love heat, toss the ribs with 1 tbsp gochujang (Korean chili paste) mixed into the dry rub before searing. For a Cajun twist, add 1 tsp cayenne, 1 tsp garlic powder, and 1 tsp onion powder to the seasoning blend.
After braising, brush the ribs with a mix of 2 tbsp hot honey and 1 tbsp sriracha during the final crisping stage for a sticky, fiery glaze. 🔥
Herb-Infused Flavors
Fresh herbs elevate the ribs to new heights. Add 2 sprigs rosemary and 2 sprigs thyme to the braising liquid for an earthy aroma. Alternatively, blend 2 tbsp fresh parsley, 1 tbsp fresh cilantro, and 1 tbsp fresh mint into the reduced sauce for a bright, herbaceous finish.
For a Mediterranean twist, include 1 tsp dried oregano and ½ tsp cinnamon in the dry rub. ✨
Sweet and Tangy Twists
Swap the apple cider vinegar for ½ cup pineapple juice to add a tropical sweetness that tenderizes the meat. For a bourbon-glazed finish, deglaze the roasting pan with 2 tbsp bourbon after searing and reduce it into the braising liquid.
A splash of 1 tbsp soy sauce in the braising liquid adds umami depth, while 1 tbsp fish sauce (if you're adventurous) brings a salty, fermented complexity. 🍯
Global Fusion Flavors
For a Korean-inspired version, add 1 tbsp gochugaru (Korean red pepper flakes) and 1 tbsp soy sauce to the dry rub. After braising, glaze the ribs with a mix of 2 tbsp gochujang, 1 tbsp honey, and 1 tbsp rice vinegar.
For a Mexican twist, season the ribs with 1 tsp cumin, 1 tsp coriander, and ½ tsp cinnamon, then serve with a side of salsa verde. 🌎
Dry Rub Alternatives
Experiment with different dry rubs to change the flavor profile entirely. For a coffee rub, mix 1 tbsp instant coffee with the smoked paprika and brown sugar. A coffee-chili rub (using 1 tsp chili powder) adds a deep, smoky heat.
For a citrusy kick, add 1 tbsp orange zest to the dry rub and a splash of orange juice** to the braising liquid. The acidity cuts through the richness beautifully. 🍊
Nutrition facts
Frequently asked questions about oven-baked beef ribs
Can I use beef back ribs instead of short ribs?
Yes, but expect slightly different results. Beef back ribs (like St. Louis-style) will need an extra 30-60 minutes of braising time since they're more tender. Short ribs have more connective tissue, which breaks down beautifully with this method. For back ribs, check doneness at 185°F internal temp rather than 195-200°F. The crispy finish works the same way!
Why do my oven-baked ribs turn out tough instead of tender?
This usually happens when ribs aren't cooked long enough or the oven temperature fluctuates. Always use a meat thermometer - ribs need to reach 195-200°F internally. Keep your oven at a steady 300°F during braising, and avoid opening the door frequently. The two-phase method (sear + braise + crisp) is key for tenderness.
How do I make these ribs spicier?
Add 1-2 teaspoons cayenne pepper to the dry rub, or mix 1 tablespoon gochujang (Korean chili paste) into the braising liquid. For extra heat, brush the ribs with a mix of 1 tablespoon sriracha and 1 tablespoon honey during the final 5-minute crisping stage. Start with less if you're sensitive to heat!
Can I prepare the ribs ahead of time?
Prep the ribs and braising liquid up to 2 days ahead - store them uncovered in the fridge. For the best results, bake them straight from the fridge (no need to bring to room temp). Leftovers keep well for 4 days refrigerated or 3 months frozen. The flavor actually improves after resting!
What's the best way to serve these oven-baked ribs?
These ribs shine with classic sides like creamy mashed potatoes, tangy coleslaw, or grilled corn. For extra flavor, serve with the reduced braising sauce spooned over each rack. Pair with a crisp white wine (like Sauvignon Blanc) or a hoppy IPA to cut through the richness. The crispy edges make them perfect for pulling apart!