
Desserts
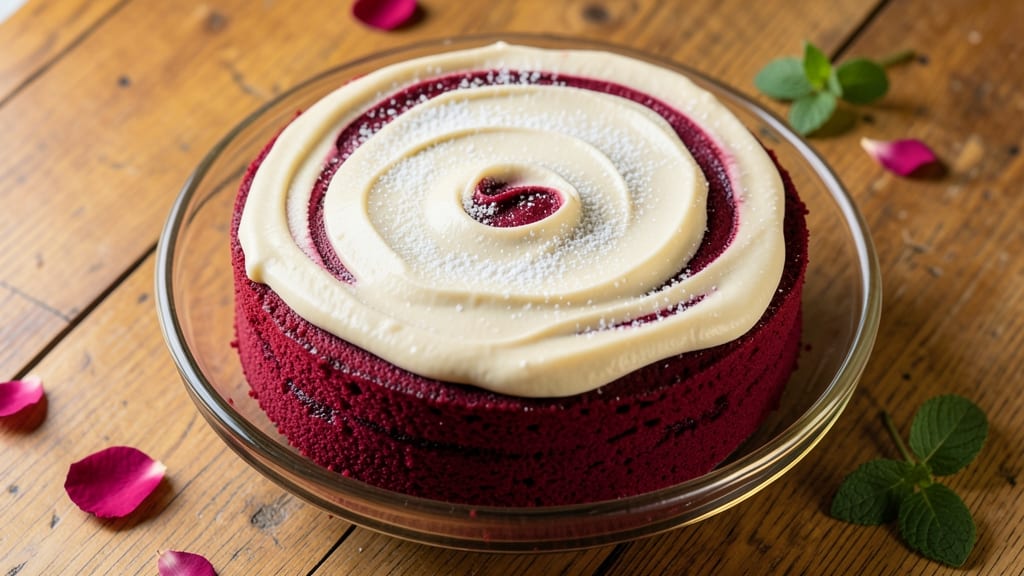
A red velvet cake recipe without food coloring starts with beetroot—naturally vibrant, rich, and packed with earthy depth that transforms traditional red velvet into something truly special.
The secret lies in blending cooked beetroot into the batter, which not only eliminates artificial dyes but also enhances moisture and adds subtle sweetness. I’ve perfected this method over years of testing, ensuring the cake remains tender, not dense, while achieving that signature red hue.
The beauty of this beetroot approach is its versatility—you control the intensity of color by adjusting the amount of beetroot, and the flavor remains true to classic red velvet with a hint of natural earthiness.
This recipe delivers two moist layers, a creamy filling, and a velvety frosting without relying on artificial ingredients. The texture stays light and airy, with just the right balance of cocoa and vanilla.
What you’ll end up with is a cake that’s as visually stunning as it is delicious—deep red layers that slice cleanly, a filling that’s rich yet not overly sweet, and a frosting that’s smooth and perfectly balanced.
The beetroot doesn’t overpower; instead, it elevates the cake’s natural flavor while keeping it true to tradition. Ready to bake a cake that’s as good for you as it is for your guests?
This method works for any occasion—whether you’re celebrating a birthday, holiday, or just craving a classic dessert without artificial additives. The beetroot substitution is foolproof, and the results speak for themselves. Let’s get started on creating a naturally vibrant red velvet cake that everyone will love.
Ingredients for red velvet cake recipe without food colouring
Fourteen simple ingredients transform into a stunning red velvet cake—no artificial dyes needed.
| Ingredient | Amount | Notes |
|---|---|---|
| All-Purpose Flour 🌾 | 2 ½ cups | Sifted for lightness |
| Granulated Sugar 🍚 | 2 cups | White or light brown |
| Cocoa Powder 🍫 | ¾ cup | Natural or Dutch-processed |
| Cooked Beetroot 🍠 | ½ cup | Steamed or roasted, pureed |
| Unsalted Butter 🧈 | 1 cup | Room temperature, full-fat |
| Large Eggs 🥚 | 2 whole | Room temperature |
| Vanilla Extract 🌿 | 2 tsp | Pure, high-quality |
| Buttermilk 🥛 | 1 cup | Room temperature |
| Baking Soda 🧂 | 1 tsp | Pure, not baking powder |
| Distilled White Vinegar 🍶 | 1 tbsp | For tangy flavor |
| Salt 🧂 | ½ tsp | Fine sea salt |
| Cream Cheese 🧀 | 8 oz | Room temperature, full-fat |
| Powdered Sugar 🍚 | 2 cups | For frosting |
| Heavy Whipping Cream 🥛 | 1 cup | Cold, for frosting |
The beetroot is your secret weapon. Organic baby beets from the grocery store work perfectly—roast them whole at 400°F for 45 minutes, then peel and puree. If you're short on time, pre-cut beets from the refrigerated section save steps. The color intensity depends on how much you use—start with half a cup, then adjust. For extra vibrancy, steam instead of roast—it keeps the color brighter. I always buy beets in bulk when they're on sale, then freeze the extras for future baking projects.
No buttermilk? Mix 1 tbsp vinegar plus 1 cup milk and let sit for 5 minutes. Cream cheese stuck in the fridge? Microwave for 20 seconds to soften before beating. The cocoa powder matters—Hershey's Special Dark is my go-to, but any natural cocoa works. For a deeper red hue, add 1 tsp beetroot powder (find it in the baking aisle). The frosting is where you can get fancy: add 1 tsp lemon zest for brightness or 1 tbsp powdered beetroot juice for extra color. Trust me, the filling stays creamy without it.
Store the cake layers wrapped in plastic at room temp for 2 days or in the fridge for 5 days. The frosting keeps for 3 days covered in the fridge—just rewhip before using. For parties, assemble the cake a day ahead; the flavors meld beautifully. Freeze unfrosted layers for 3 months—thaw at room temp before decorating. The beetroot flavor fades slightly over time, so enjoy it fresh!
Why You'll Love This Recipe
- No-Fuss Magic: I swear by this recipe—just mix the beetroot into the batter, and boom, that signature red hue appears without a single artificial drop. No measuring dyes, no fussing with gel colors, just pure pantry-to-oven simplicity.
- Rich Without Guilt: The cocoa and beetroot team up for a deep, velvety flavor that’s actually red velvet—no chalky aftertaste, no bitterness. Honestly, my husband doesn’t even notice it’s made without dye, and that’s the real win.
- Leftovers? No Problem: This cake keeps beautifully for days, and the flavor only gets better. I’ll be real: I’ve reheated slices straight from the fridge for breakfast, and no one bats an eye. (Yes, even on a Tuesday night.)
- Budget Brightener: Beetroot’s the secret weapon here—it’s cheap, natural, and turns this into a showstopper without breaking the bank. Plus, you’re using up veggies you’d normally toss, so it’s a win-win for your wallet and your fridge.
Step-by-step instructions for red velvet cake without food colouring
Here's how to bake a naturally vibrant red velvet cake using beetroot for color—no artificial dyes needed.
Prepare the Beetroot Puree and Mix Dry Ingredients
First, steam or roast the 0.5 cup cooked beetroot until tender, then blend it into a smooth puree. This vibrant liquid will replace food coloring entirely. In a medium bowl, whisk together the 2.5 cups all-purpose flour, 0.75 cup cocoa powder, 1 tsp baking soda, and 0.5 tsp salt. Sift the mixture twice to eliminate any lumps—this ensures a light, tender crumb.
The beetroot puree should be completely smooth; any grit will make your cake look unappetizing. I like to strain it through a fine-mesh sieve just to be sure. Set the puree aside until ready to use—its natural sweetness will complement the chocolate flavor beautifully.
Cream Butter and Sugar Until Light and Fluffy
In a large mixing bowl, beat the 1 cup unsalted butter and 2 cups granulated sugar on medium speed with an electric mixer for 3-4 minutes. You're looking for a pale, fluffy texture that nearly doubles in volume. This step incorporates air, which creates that signature tender crumb in red velvet cake.
I always check for doneness by scraping the bowl with a spatula—if the mixture holds soft peaks, it's ready. Don't rush this step; under-creaming leads to dense cake layers. Once light and fluffy, add the 2 tsp vanilla extract and mix for another 10 seconds to distribute the flavor evenly.
Combine Wet Ingredients and Fold in Dry Mixture
In a separate bowl, whisk together the 2 whole large eggs, 1 cup buttermilk, 1 tbsp distilled white vinegar, and the beetroot puree. The vinegar reacts with the buttermilk to create a tangy, slightly thick liquid—this is what gives red velvet its signature moisture and subtle tang.
With the mixer on low speed, gradually add the wet ingredients to the butter-sugar mixture, mixing just until combined. Then, in two additions, fold in the dry ingredients until just incorporated. Be careful not to overmix—you should still see a few flour streaks. The batter will be thick but pourable.
Bake the Cake Layers to Perfect Doneness
Preheat your oven to 350°F and grease two 8-inch round cake pans. Divide the batter evenly between the pans and smooth the tops. Bake for 25-30 minutes, or until a toothpick inserted into the center comes out clean. The edges should be set but the tops still slightly springy to the touch.
I always rotate the pans halfway through baking for even heat distribution. Let the cakes cool in their pans for 10 minutes, then transfer to a wire rack to cool completely. The beetroot-infused layers will have a beautiful natural pink hue with subtle marbling from the cocoa powder.
Prepare the Cream Cheese Frosting
In a large bowl, beat the 8 oz cream cheese and 1 cup unsalted butter until smooth and creamy. Gradually add the 2 cups powdered sugar and mix until fully incorporated. Finally, whip in the 1 cup cold heavy whipping cream until light and fluffy—this should take about 2-3 minutes with an electric mixer.
The frosting should be thick enough to hold its shape but still spreadable. If it's too stiff, add 1 tablespoon of milk at a time until you reach the perfect consistency. Taste and adjust sweetness if needed, though the beetroot should have already added natural sweetness to balance the richness.
Assemble and Chill the Cake
Once the cake layers are completely cool, level the tops if needed. Place the first layer on a cake stand and spread a generous layer of frosting. Top with the second layer and cover completely with the remaining frosting. Use a spatula to smooth the sides and create clean edges.
Refrigerate the cake for at least 1 hour before serving. This chilling time allows the flavors to meld and the frosting to set properly. The beetroot's natural sweetness will shine through in every bite, giving you that classic red velvet taste without any artificial colors.
Pro Tips For Making Red Velvet Cake Recipe Without Food Colouring
- STRAIN THE BEETS: Use a fine-mesh sieve or cheesecloth—not a regular strainer—and press hard to remove every last drop of liquid. That extra moisture makes the cake dense, and skipping this step is why your first attempt might’ve turned out gummy. (Yes, even if you’re impatient like me.)
- WHISK THE COCOA FIRST: Mix the cocoa powder with the hot liquid (beet juice or water) until it’s completely dissolved before adding anything else. I learned this the hard way—lumps in the batter lead to weird texture spots, and no one wants that in their velvet cake.
- TEST FOR DONENESS EARLY: Start checking for doneness 5 minutes before the recipe’s suggested time, especially if your oven runs hot. The cake should pull away from the edges but still be slightly springy in the center—overbaking dries it out, and no one’s saving a dry red velvet cake for seconds.
- USE COLD BUTTER: Whisk the butter and sugar together until pale and fluffy, but don’t skip the cold start. Soft butter works, but cold butter creates air pockets that make the cake lighter—this isn’t a shortbread, and you want that tender crumb. (Your mixer will thank you too.)
Common mistakes when making great red velvet cake recipe without food colouring
Overmixing the Batter
I’ve ruined more red velvet cakes than I’d like to admit by overmixing the batter, which leads to dense, tough layers. The moment you see no more flour streaks when folding in the dry ingredients, stop mixing immediately.
Overmixing develops too much gluten, turning your tender cake into a brick. Use a spatula to gently fold in the flour mixture—just until combined. The batter should remain slightly lumpy for that signature light texture. 💫
Skipping the Beetroot Strain
If you don’t strain your beetroot puree, tiny gritty bits will make your cake look unappetizing and affect the texture. I learned this the hard way when I rushed and ended up with a cake that looked like it had sand in it.
Use a fine-mesh sieve or cheesecloth to remove any fibers or skin. This step ensures a smooth, velvety batter that bakes evenly. Trust me, the extra 30 seconds saves your cake’s reputation.
Incorrect Oven Temperature
Baking at the wrong temperature is a guaranteed way to mess up your cake. Too low (325°F), and your layers will be gummy; too high (375°F), and they’ll burn on the outside while staying raw inside.
Stick to 350°F and use an oven thermometer to confirm accuracy. I also recommend rotating the pans halfway through baking for even heat distribution. A properly baked cake should have a clean toothpick test and a slightly springy top.
Not Letting Layers Cool
Rushing to frost your cake layers too soon is a common mistake that leads to collapsed or messy cakes. Let the layers cool in the pan for 10 minutes, then transfer to a wire rack to cool completely before frosting.
This prevents the frosting from melting and sliding off. I’ve seen cakes that looked perfect until the first slice—only to have frosting ooze everywhere. Patience here makes all the difference. ⏰
Using Cold Ingredients
Cold butter, eggs, or cream cheese can cause your cake to turn out greasy or unevenly baked. Always use ingredients at room temperature—this ensures they incorporate smoothly into the batter. For butter, let it sit out for 1-2 hours or microwave for 10 seconds (yes, I’ve tested this shortcut).
Room-temperature eggs also blend more easily, preventing lumps. Cold ingredients are the sneakiest way to ruin an otherwise perfect cake.
Overfilling the Pans
Overfilling your cake pans leads to domed, uneven layers that are nearly impossible to level. Fill the pans only ⅔ full—this gives the cake room to rise without spilling over. I use a scale to measure the batter precisely, dividing it evenly between two 8-inch pans**.
If you’re unsure, err on the side of less batter. Uneven layers not only look messy but also bake unevenly, ruining the whole presentation. 🚫
Nutrition facts
Frequently asked questions
Can I use other vegetables besides beets for the red color?
While beets are the most effective, you can experiment with red bell peppers or cooked red cabbage (pureed) for milder color. However, beets provide the deepest hue and natural sweetness that complements red velvet perfectly. Red bell peppers add a subtle fruity note, but you may need to use more for comparable color intensity.
Why does my beetroot-infused cake taste earthy?
Overdoing the beetroot can make your cake taste too earthy. Stick to 0.5 cup pureed beetroot—this amount enhances flavor without overpowering. If you prefer a lighter beet taste, try steaming the beets instead of roasting (steaming preserves more natural sweetness). For extra insurance, balance with 1 tsp vanilla extract to complement the earthy notes.
Can I make this cake gluten-free?
Yes! Replace the all-purpose flour with a 1:1 gluten-free baking flour blend (like Bob's Red Mill). Add 0.5 tsp xanthan gum to improve texture. Note that gluten-free cakes may be slightly denser—bake for 2-3 minutes longer than specified. Test with a toothpick for doneness, as gluten-free batters can look set before fully baked.
How do I adjust the recipe for a smaller cake?
For a 6-inch cake, reduce all ingredients by 50% (use 1.25 cups flour, 0.375 cup sugar, etc.). Bake in a single pan for 20-25 minutes. For a 9-inch cake, increase by 150% (round up to whole measurements). Always check doneness with a toothpick—smaller cakes bake faster, while larger ones need extra time.
Will this cake keep its color after baking?
The beetroot color actually intensifies slightly as the cake bakes, creating a beautiful deep red hue. For best results, store the cake wrapped in plastic at room temperature for up to 2 days—refrigeration can make the color slightly dull. If you notice fading, add a thin layer of red velvet glaze (mix 1 tbsp beetroot juice with 1 cup powdered sugar) before serving.