
Main Courses
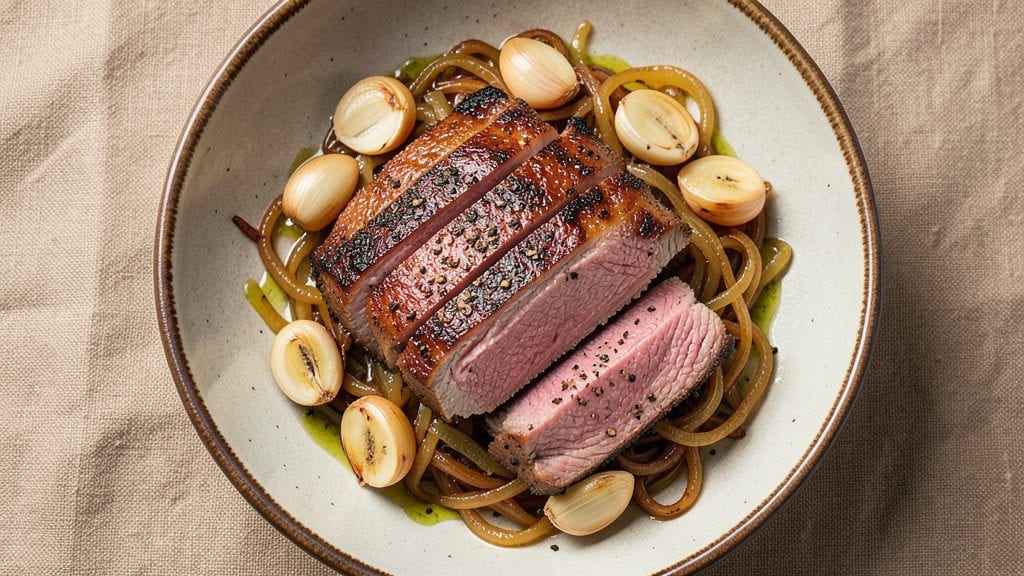
Veal shoulder arm steak transforms from tough to fork-tender magic when slow-braised with precision—a technique I’ve perfected over years of testing. The key lies in low-and-slow cooking that breaks down collagen into velvety richness while preserving natural flavor. This isn’t just meat; it’s a restaurant-worthy centerpiece that deserves your Sunday table.
What sets this method apart is the balance between tradition and simplicity: no fancy equipment, just a Dutch oven and patience. A dry brine overnight ensures maximum moisture retention, while a high-heat sear locks in juices before the long braise.
The result? Meat so tender it falls apart at the touch, with a deep, caramelized crust that’s impossible to resist.
By the time you’re serving, you’ll have a dish that feels luxurious yet approachable—perfect for special occasions or weeknight indulgence. The aroma alone will have everyone gathering at the table, and each bite delivers that melt-in-your-mouth satisfaction you crave. Let’s create something unforgettable.
Pair it with roasted root vegetables or a crisp white wine reduction to elevate the experience further. This recipe isn’t just about cooking; it’s about crafting a meal that leaves a lasting impression. Ready to master it?
Ingredients for veal shoulder arm steak
Fourteen ingredients transform tough veal into melt-in-your-mouth perfection—no shortcuts, just patience and precision.
| Ingredient | Amount | Notes |
|---|---|---|
| Veal Shoulder Arm Steak 🥩 | 3 lb | Bone-in, cut into 2-inch chunks |
| Diamond Crystal Kosher Salt 🧂 | 1 ½ tbsp | For dry brine overnight |
| Freshly Ground Black Pepper 🌶️ | 1 tsp | Coarse grind preferred |
| Extra-Virgin Olive Oil 🫒 | ¼ cup | For searing and basting |
| Yellow Onion 🧅 | 1 whole | Chopped into 1/2-inch pieces |
| Garlic Cloves 🧄 | 6 cloves | Smashed, not minced |
| Fresh Rosemary 🌿 | ¼ cup | Chopped sprigs, not dried |
| Fresh Thyme 🌿 | ¼ cup | Leaves only, stems removed |
| Dry Red Wine 🍷 | 1 cup | Bold variety like Cabernet |
| Beef Bone Broth 💧 | 2 cups | Homemade or high-quality store-bought |
| Tomato Paste 🍅 | 2 tbsp | Squeeze tube preferred |
| Unsalted Butter 🧈 | 2 tbsp | For basting at the end |
| Fresh Bay Leaves 🍃 | 2 whole | For aromatic depth |
| Fresh Parsley 🌿 | ⅛ cup | Chopped, for garnish |
The veal shoulder arm steak is your star, so source it from a trusted butcher—look for vibrant color and good marbling. Costco or Whole Foods usually carry it pre-cut, but if buying whole, ask for the arm section. The bone-in pieces stay juicier. I always buy mine 2-3 days ahead to let it sit uncovered in the fridge—this helps the surface dry slightly for better searing. Fresh herbs like rosemary and thyme should smell bright and aromatic; if they’re wilted, skip them. For the wine, Cabernet Sauvignon or Merlot adds depth without overpowering.
No red wine? Substitute beef broth with 1 tbsp balsamic vinegar—it mimics the acidity. Fresh herbs wilted? Dried thyme at one-third the amount works in a pinch. The tomato paste can be swapped for crushed tomatoes (1/2 cup), but you’ll lose that concentrated umami punch. If you’re short on time, use pre-chopped onions (the good stuff, not the pre-shredded kind). For the butter at the end, brown it first—this adds nutty richness. The bay leaves? Don’t skip them; they’re the secret to that restaurant-quality aroma.
This dish tastes even better the next day—plan ahead. Store leftovers in an airtight container for up to 4 days in the fridge or freeze for 3 months. I like to reheat portions in the oven at 300°F until warmed through. The meat gets more tender with each reheat, so don’t be afraid to make extra. Garnish with fresh parsley right before serving—it brightens up the dish and makes it look like you slaved over it (even if you didn’t).
Why You'll Love This Recipe
- I’ll be real: this works for everything. Toss it together for a Tuesday dinner, double it for a dinner party, or pack leftovers for lunch—it’s just as good cold as it is hot. (Yes, even on a Tuesday night.)
- Here’s what sold me: veal shoulder is way more affordable than ribeye, but it delivers restaurant-quality richness. A single steak feeds two, and the leftovers? Perfect for sandwiches or pasta the next day—no waste, all flavor.
Step-by-step instructions for slow-braised veal shoulder arm steak
Here's how to transform tough veal into melt-in-your-mouth perfection through slow braising.
Dry Brine and Sear the Veal
Pat the 3 lb veal shoulder arm steak dry with paper towels—this is crucial for developing that beautiful crust. In a small bowl, mix the 1.5 tbsp diamond crystal kosher salt and 1 tsp freshly ground black pepper, then rub this generously over the veal, pressing it into all the crevices. Place the seasoned meat on a wire rack set over a baking sheet and refrigerate uncovered for at least 12 hours, or ideally overnight. This dry brine process ensures maximum flavor penetration and helps tenderize the meat.
When ready to cook, remove the veal from the refrigerator and let it sit at room temperature for 30 minutes. Heat a heavy Dutch oven over medium-high heat and add the 0.25 cup extra-virgin olive oil. Once shimmering, add the veal in a single layer and sear undisturbed for 4-5 minutes per side until deeply browned. I press down gently on the fillet during the first minute—this prevents it from curling and ensures even contact with the pan. Transfer the seared veal to a plate and set aside.
Build the Aromatic Base
In the same Dutch oven, add the chopped 1 whole yellow onion and cook for 5-6 minutes until softened and beginning to caramelize. Add the 6 smashed garlic cloves and cook for another 30 seconds until fragrant—don't let them burn, or you'll taste bitter notes in your final dish. Stir in the 0.25 cup chopped fresh rosemary and 0.25 cup fresh thyme leaves, cooking for 1 minute to release their essential oils.
Pour in the 1 cup dry red wine and scrape up all the browned bits from the bottom of the pot with a wooden spoon. This deglazing step captures all the concentrated flavor from the searing process. Let the wine simmer for 3-4 minutes until reduced by half, then stir in the 2 tbsp tomato paste and cook for 1 minute to develop its rich, umami flavor. Add the 2 whole fresh bay leaves and 2 cups beef bone broth, bringing everything to a gentle simmer.
Braise Until Fork-Tender
Return the seared veal to the Dutch oven, along with any accumulated juices. The liquid should come about halfway up the sides of the meat. Cover the pot tightly with a lid and transfer to a preheated 325°F oven. Braise for 3 hours, then check for doneness by inserting a fork into the thickest part of the meat—it should slide in easily with no resistance. If it's not yet tender, continue braising for another 30-45 minutes.
Here's the thing—this is where patience pays off. The long, slow cook time breaks down the tough connective tissue, transforming it into silky strands that melt in your mouth. I check the meat every 30 minutes during the final hour to ensure it doesn't dry out. If the liquid reduces too much, add a splash of water or broth to keep the veal moist.
Finish with Butter and Garnish
Once the veal is fork-tender, remove it from the pot and transfer to a cutting board. Tent loosely with foil and let it rest for 15 minutes—this resting period allows the juices to redistribute throughout the meat. Skim any excess fat from the braising liquid, then return the pot to medium heat. Add the 2 tbsp unsalted butter and stir until melted and incorporated, creating a glossy finish for your dish.
Slice the veal against the grain into ½-inch thick pieces and arrange on a platter. Ladle the braising sauce over the top and garnish with the 0.125 cup chopped fresh parsley. Serve immediately with crusty bread or roasted potatoes to soak up every last bit of that rich, aromatic sauce. The result should be velvety, fork-tender meat with layers of deep, savory flavor that will have everyone asking for seconds.
Pro Tips For Making Veal Shoulder Arm Steak
- Sear in Two Stages: Start with a screaming-hot pan—veal needs that initial crust to lock in flavor—but after 2 minutes, pull it off and let the onions caramelize first. I used to rush this and ended up with a steak that tasted like it was swimming in oil. Give the onions 5 minutes to soften and deepen before the steak returns for its final sear.
- Salt the Onions: Toss those sliced onions with a pinch of kosher salt before they hit the pan. It draws out moisture, so they caramelize faster and don’t steam into mush. (Yes, even if you’re impatient like me—this cuts cooking time by half.)
- Don’t Crowd the Pan: Veal shoulder arm steak is thick and needs room to breathe. If you pile onions or other veggies too close, they’ll steam instead of brown. Spread them out like you’re laying a puzzle—this isn’t the time to be lazy with prep.
- Rest Under Foil: After searing, tent the steak with foil and let it sit for 5 minutes. I learned this the hard way—skipping it made the meat dry out by the time I sliced. The residual heat keeps it juicy, and the foil traps the steam like a mini sauna.
Essential equipment for this recipe
Dutch Oven Essentials
A heavy-duty Dutch oven (like the Lodge 5.5-quart) is non-negotiable for this recipe—its thick walls distribute heat evenly, preventing hot spots that could dry out your veal.
I prefer enameled cast iron for its durability and even heat retention, but a stainless steel Dutch oven (like All-Clad) works too if you have one. Avoid nonstick—it can’t handle the high heat needed for searing. 🔥
Precision Thermometer
An instant-read meat thermometer (I swear by ThermoWorks Smoke) is your best friend for checking doneness. The veal should reach 195-203°F internally—any lower, and it may not be fork-tender.
A probe thermometer (like Meater) lets you monitor the oven’s temperature too, ensuring it stays at 325°F without fluctuation. Never guess—this is where perfection happens.
Wire Rack and Baking Sheet
For the dry brine, a wire rack (placed over a baking sheet) is critical—it allows air to circulate around the veal, preventing moisture buildup that dulls the sear. I use a stainless steel rack (like OXO Good Grips) because it’s sturdy and easy to clean.
If you don’t have one, a cooling rack from the grocery store works in a pinch. Pro tip: Line the sheet with parchment for easy cleanup.
Wooden Spoon and Tongs
A heat-resistant wooden spoon (I love Oxo Good Grips) is perfect for deglazing the Dutch oven—it won’t scratch the enamel or melt like plastic. For flipping the veal during searing, tongs (like J. Henckels) give you better control than a spatula.
Avoid metal utensils when the pot is hot—they can cause dangerous splatters. 💪
Knife and Cutting Board
Slice the veal against the grain with a sharp chef’s knife (I recommend Wüsthof Classic). A stable cutting board (like Teakhaus bamboo) prevents slipping, especially when you’re cutting through tender meat.
For the aromatics, a small chef’s knife works for onions and garlic, but a serrated knife (like Victorinox) makes quick work of fresh herbs. Always keep your knives sharp—dull blades crush meat instead of cleanly slicing it.
Optional: Sous Vide Setup
For a modern twist, use a sous vide (like Anova Precision Cooker) to cook the veal at 160°F for 24 hours before searing and finishing in the Dutch oven. This method guarantees ultra-tender meat with minimal effort.
If you go this route, skip the dry brine and season the veal right before searing. The sous vide just handles the long, slow cooking—you’ll still need the Dutch oven for that perfect crust. ✨
Nutrition facts
Frequently asked questions
Why does veal shoulder arm steak need such a long cooking time?
The long braising time—3 hours at 325°F—is essential because this cut comes from the shoulder, which contains tough connective tissue. The slow cook transforms these fibers into silky, melt-in-your-mouth strands while preserving moisture. Skipping this step results in chewy meat, no matter how good your sear.
Can I substitute beef short ribs for veal shoulder?
Yes! Beef short ribs work beautifully, but adjust the cooking time to 3.5-4 hours since they’re even tougher. Use the same method—dry brine, sear, then braise. The flavor will be richer and deeper, though slightly gamier than veal. For a closer match, opt for beef chuck roast instead.
What’s the best way to reheat leftovers?
Reheat in a 300°F oven for 20-30 minutes in an airtight container until warmed through. Avoid microwaving—it dries out the meat. Leftovers actually improve in flavor, becoming even more tender. Store in the fridge for up to 4 days or freeze for 3 months.
How do I know when the veal is done?
Use a meat thermometer—the internal temp should reach 195-203°F. The fork-tenderness test is foolproof too: Insert a fork into the thickest part. If it slides in effortlessly with no resistance, it’s ready. Overcooking past 205°F risks drying it out, so monitor closely during the final 30 minutes.
Can I make this in an Instant Pot?
Yes! Sear the veal first in a skillet, then transfer to the Instant Pot with all aromatics. Cook on high pressure for 60 minutes, then quick-release. Finish with butter and herbs. The texture will be slightly different—more tender but less caramelized—but still delicious. For extra richness, add 1 cup beef broth during cooking.